Unit: AM/FM Stereo Receiver
Manufacturer: Marantz
Model: SR2000
SN: 9XK040161
One of my customers brought this vintage receiver on my bench for full restoration. It was originally purchased overseas in the early 80's and later brought to the US. The receiver was serviced at a local repair shop about ten years ago but has not been used a lot since then. A few months ago the owner tried to hook up the speakers to this receiver and noticed that one channel was highly distorted. So, it's time to service it again.
The Marantz SR2000 was introduced in 1980 and delivers 30 watts per channel into 8 ohms with no more than 0.04% total harmonic distortion. It does not have the same build quality as famous Marantz 22XX receivers from the 70's but still has a very pleasant and detailed sound.
Initial Evaluation and Troubleshooting
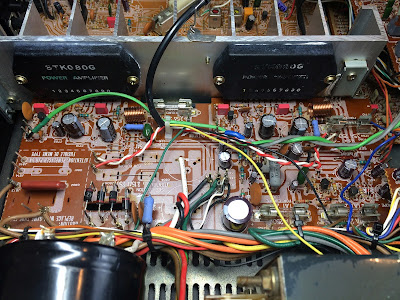
So, I plugged in this receiver in my Dim Bulb Tester (DBT), powered it up, and tested the sound with headphones. The sound from the left channel was crystal clear but faintly and distorted from the right channel. I checked the DC voltage across speaker terminals and it was ~55mV on the left channel but ~34V on the right channel. Well, there is definitely a problem with the right channel. This model uses STK power packs instead of discrete power transistors in the output stage of the power amplifier. I checked the operating voltages on all pins of both STK-080G power packs and compared them against the schematic. The voltage measured on each pin of power pack Q701 was very close to the reference voltage on the schematic which is a good sign. This power pack is installed in the left channel and it sounds clear in headphones. However, the voltage measured on four pins of power pack Q702 was different from that on the schematic (see the test results below).
Test results on STK-080G power packs (Q701 & Q702) - before restoration:
pin 1: schematic: 0.06V, left channel: 0.15V, right channel: 0.32V
pin 2: schematic: 0V, left channel: 0V, right channel: 0V
pin 3: schematic: 0.03V, left channel: 0.15V, right channel: 7.8V
pin 4: schematic: -35V, left channel: -35V, right channel: -35V
pin 5: schematic: -1.1V, left channel: -1.3V, right channel: -35V
pin 6: schematic: -35V, left channel: -35V, right channel: -35V
pin 7: schematic: 0V, left channel: 0V, right channel: 34V
pin 8: schematic: 35V, left channel: 35V, right channel: 35V
pin 9: schematic: 1.1V, left channel: 1.2V, right channel: 0V
pin 10: schematic: 35V, left channel: 35V, right channel: 35V
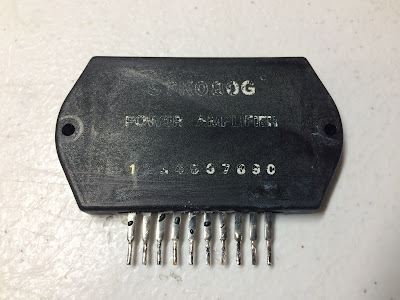
The voltage on pins 5 and 7 was ~35V DC instead of -1.1 and 0V, respectively. This is a sign of a burned power pack since +/- 35V is a power supply voltage to the STK-080G and only pins 4, 6, 8, and 10 are supposed to be under this voltage. Interestingly enough that the burned power pack from the right channel has been replaced in the past. And I believe this is the same pack that was changed in the repair shop. The lettering on this power pack doesn't look original to me. Anyway. It should be replaced again.
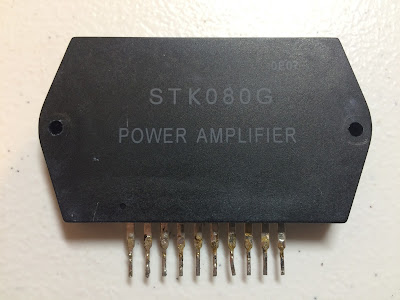
STK-080G power packs - before restoration
Before I unsolder the burned STK power pack from the right channel I decided to check the pre-amp section and make sure that there are no problems here. So, I connected the function generator to the AUX terminals, applied a sine-wave signal of 1 kHz, and traced the input signal with my oscilloscope throughout all boards down to the STK power packs. The sine-wave signal was perfect, with no distortion from the AUX terminals throughout all boards and down to pin 1 of STK power packs Q701 and Q702. Pins 1 is input in STK-080G, whereas pin 7 is output. This test showed that the pre-amp section has no issues. The distorted and faintly sound from the right channel is due to burned power pack Q702. I replaced this pack with another STK-080G which I bought a long time ago from the old stock. Note that the lettering on the new power pack matches with installed on the left channel.
Burned STK-080G power pack Q702 from the right channel - front and back sides
New STK-080G power pack from the old stock installed instead of burned one
After a new STK power pack was installed I checked the operating voltages again on all pins and now they were very close to the reference voltages on the schematic. A quick test confirmed that the sine-wave signal on pin 7 is clear without any distortion.
Another issue I noticed in this unit was related to the bad ground connection. The resistance measured between the chassis and negative speaker terminal was ~2.2Ω instead of 0Ω. As a result, the DC offset on both speaker terminals was floating around 55mV, +/- 20mV. I found a loose ground connection on the tuner board and tightened it up (see picture below). Another area of bad ground connection was found between the main amplifier & power supply board P700 and the chassis. I cleaned the ground pad and also added some solder to it. It solved the DC offset problem and the resistance measured between the chassis and negative speaker terminal became 0Ω as supposed. The DC offset measured across speaker terminals is now ~6mV on each channel.
Loosen ground connection on the tuner board - floating DC offset on speaker terminals
Another bad ground connection between the PCB and the chassis
Main Amp & Power Supply Board P700
The power supply circuit on this board has nine aluminum electrolytic capacitors C807 thru C809, C811 thru C813, C815, C817, and C818. All of them were replaced with high-reliability low impedance Nichicon UPW caps. Two large filter capacitors C803/C804 were tested with Atlas ESR70 capacitance meter. Both caps are still within the factory capacitance tolerance and have almost zero ESR.
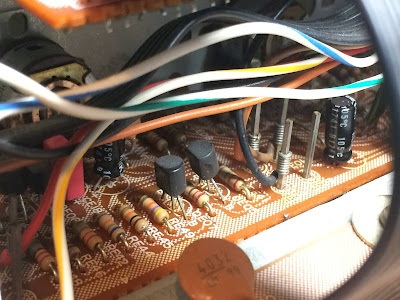
The main amplifier circuit has 14 aluminum electrolytic capacitors C703 thru C708, C713 thru C716, and C723 thru C726. Two of them C703 and C704 are installed in the signal path. I replaced these e-caps with high-quality film polyester WIMA MKS2 caps to improve a signal-to-noise ratio. For some reason, the manufacturer installed just ordinary aluminum e-caps in these positions (cost reduction?). The remaining 12 electrolytic capacitors were replaced with low impedance Nichicon UPW caps. Note that four of them C723 thru C726 are soldered on the back (foil) side of PCB.
All original e-caps removed from the main amplifier & power supply board were tested with Atlas ESR70 capacitance meter and results are below.
Test results on original capacitors removed from the main amplifier & power supply board:
C703: rated capacitance – 1uF, measured – 1.1uF, ESR – 1.9Ω, deviation: +10%
C704: rated capacitance – 1uF, measured – 1.1uF, ESR – 2.3Ω, deviation: +10%
C705: rated capacitance – 47uF, measured – 54uF, ESR – 0.46Ω, deviation: +15%
C706: rated capacitance – 47uF, measured – 46uF, ESR – 0.39Ω, deviation: -2%
C707: rated capacitance – 1uF, measured – 1.1uF, ESR – 3.2Ω, deviation: +10%
C708: rated capacitance – 1uF, measured – 1.1uF, ESR – 1.95Ω, deviation: +10%
C713: rated capacitance – 220uF, measured – 250uF, ESR – 0.08Ω, deviation: +14%
C714: rated capacitance – 220uF, measured – 250uF, ESR – 0.08Ω, deviation: +14%
C715: rated capacitance – 220uF, measured – 250uF, ESR – 0.08Ω, deviation: +14%
C716: rated capacitance – 220uF, measured – 250uF, ESR – 0.08Ω, deviation: +14%
C723: rated capacitance – 10uF, measured – 10uF, ESR – 1.3Ω, deviation: 0%
C724: rated capacitance – 10uF, measured – 11uF, ESR – 1.5Ω, deviation: +10%
C725: rated capacitance – 10uF, measured – 10uF, ESR – 1.4Ω, deviation: 0%
C726: rated capacitance – 10uF, measured – 11uF, ESR – 1.4Ω, deviation: +10%
C807: rated capacitance – 470uF, measured – 509uF, ESR – 0.05Ω, deviation: +8%
C808: rated capacitance – 47uF, measured – 52uF, ESR – 0.31Ω, deviation: +11%
C809: rated capacitance – 22uF, measured – 24uF, ESR – 0.39Ω, deviation: +9%
C811: rated capacitance – 220uF, measured – 210uF, ESR – 0.16Ω, deviation: -5%
C812: rated capacitance – 10uF, measured – 11uF, ESR – 1.7Ω, deviation: +10%
C813: rated capacitance – 10uF, measured – 10uF, ESR – 2.1Ω, deviation: 0%
C815: rated capacitance – 10uF, measured – 11uF, ESR – 2.3Ω, deviation: +10%
Tone Amplifier Board PE00
The tone amplifier board is the most difficult to service in Marantz SR2000. In general, this board can be easily disassembled from the chassis providing much better access to all electronic components. However, two ribbon cables installed on this board make disassembling and subsequent servicing more problematic. So, I decided to service the tone amplifier board without removing it from the chassis. There were some problems accessing several particular components but it was doable with some patience and proper tools.
This board has ten electrolytic capacitors. Eight of them CE01, CE02, CE05, CE06, CE17, CE18, CE23, CE24 are lower leakage capacitors installed in the signal path. The e-caps CE01 and CE02 were replaced with film polyester Kemet caps. The e-caps CE05, CE06, CE23, and CE24 were replaced with modern low leakage Nichicon UKL caps. And the last two lower leakage capacitors CE17 and CE18 were replaced with film polyester WIMA MKS2 caps. The remaining two electrolytic capacitors on this board are aluminum e-caps CE09 and CE10. I replaced them with low impedance Nichicon UPW caps.
Test results on original capacitors removed from the tone amplifier board:
CE01: rated capacitance – 0.22uF, measured – 0.24uF, ESR – N/A, deviation: +9%
CE02: rated capacitance – 0.22uF, measured – 0.24uF, ESR – N/A, deviation: +9%
CE05: rated capacitance – 4.7uF, measured – 5.8uF, ESR – 1.5Ω, deviation: +23%
CE06: rated capacitance – 4.7uF, measured – 5.2uF, ESR – 2.2Ω, deviation: +11%
CE09: rated capacitance – 10uF, measured – 13uF, ESR – 1.4Ω, deviation: +30%
CE10: rated capacitance – 10uF, measured – 11uF, ESR – 1.7Ω, deviation: +10%
CE17: rated capacitance – 1uF, measured – 1.1uF, ESR – 2.3Ω, deviation: +10%
CE18: rated capacitance – 1uF, measured – 1.1uF, ESR – 1.9Ω, deviation: +10%
Phono Amplifier Board P400
The phono amplifier circuit P400 has no separate board and is located on the tuner board close to the PHONO and AUX inputs. This circuit has four low leakage electrolytic capacitors C401/C402 and C415/C416 installed in the signal path, and four aluminum e-caps C405, C406, C413, and C414. The e-caps C401 and C402 were replaced with modern low leakage Nichicon UKL caps. The e-caps C415 and C416 were replaced with high-quality film polyester WIMA MKS2 caps. The e-cap C413 was also replaced with a WIMA MKS2 capacitor even though this is not a low leakage cap. The rated capacitance of C413 is 1uF/50V and I prefer to replace all electrolytic capacitors with a capacitance of 1uF or less with film capacitors if the mounting space permits. The remaining three aluminum e-caps C 405, C406, and C414 were replaced with low impedance and high-reliability Nichicon UPW caps.
Test results on original capacitors removed from the phono amplifier board:
C401: rated capacitance – 3.3uF, measured – 3.5uF, ESR – 2.1Ω, deviation: +6%
C402: rated capacitance – 3.3uF, measured – 3.6uF, ESR – 2.1Ω, deviation: +9%
C405: rated capacitance – 100uF, measured – 121uF, ESR – 0.3Ω, deviation: +21%
C406: rated capacitance – 100uF, measured – 125uF, ESR – 0.3Ω, deviation: +25%
C413: rated capacitance – 1uF, measured – 1uF, ESR – 1.2Ω, deviation: 0%
C414: rated capacitance – 10uF, measured – 11uF, ESR – 0.9Ω, deviation: +10%
Power Meter & Speaker Switch Board
This board has only two electrolytic capacitors: CX03 and CX04. I replaced them with low impedance Nichicon UPW caps.
Test results on original capacitors removed from the power meter & speaker switch board:
CX03: rated capacitance – 47uF, measured – 53uF, ESR – 0.9Ω, deviation: +13%
CX04: rated capacitance – 47uF, measured – 54uF, ESR – 0.7Ω, deviation: +15%
Power meter & speaker switch board - before and after
Audio Adjustments
This unit has no adjustment points except for power meter calibration. To calibrate power meters I loaded this receiver with a low inductance 8Ω/100W dummy resistor for each channel, connected my oscilloscope across the speaker terminals, and applied a sine-wave signal of 1kHz to the AUX jacks. The volume was increased until the RMS voltage of the sine-wave signal reached 15.5V. This RMS voltage corresponds to the output power of 30W (P = (VRMS x VRMS)/8). Then, the trimming resistors RX09 and RX10 were adjusted so that the power meter reading is 30W.
Power meter adjustment
Output Power Test
The output power test was conducted at the end of the restoration. Two low inductance 8Ω/100W resistors connected across each speaker terminal were used as a dummy load. The output sine-wave signal was perfectly symmetrical on both channels with no clipping up to 15.61 VRMS (left channel) and 15.74 VRMS (right channel). The output power on each channel can be calculated based on the following formula: P = (VRMS x VRMS)/8. The max output power (before clipping) is 30.5W on the left channel and 31.0W on the right channel. This corresponds to the factory specifications of this model.
Output power test - corresponds to the factory specifications
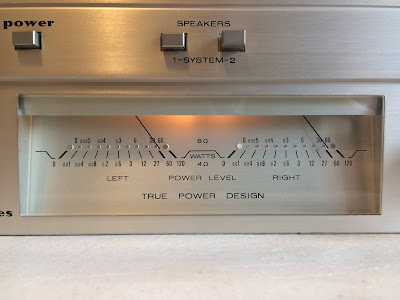
As usual, all the knobs and the faceplate were gently cleaned in warm water with dish soap. All controls have been cleaned with DeoxIT 5% contact cleaner and lubricated with DeoxIT FaderLube 5% spray. I also replaced the burned power meter lamp and installed a new incandescent one. It looks like a single 8V/100mA lamp is not enough to efficiently illuminate two large power meters. But this is a design issue.
The final result can be seen in the photos below. All issues with electronics have been solved and the receiver works normally again. Please watch a short demo video at the end of this post. Thank you for reading.
Marantz SR2000 - after restoration











I'm the owner of this Marantz SR2000 and it is awesome to have this back in working order. Oleg has done a great job with the restoration. I've got it hooked up to a set of Klipsch RP-600Ms and it sounds great! A bonus to have a writeup and video of the work done as well. Highly recommended!
ReplyDeleteThank you for your feedback!
DeleteHi Oleg, very nice restoration! I've got the same unit that for some reason has STK080 non G installed by someone. The sound is a bit harsh so I guess it's need a full recap that I'm gonna do myself as well as changing the STKs. Could you please share the list of capacitors you were used if you still have it somewhere? Спасибо!
ReplyDeleteHi George, please send me an email to repair@olegvintageaudio.com
Delete