Home

Thursday, January 21, 2021

Pioneer SX-727 Receiver Restoration

Unit: AM/FM Stereo Receiver
Manufacturer: Pioneer
Model: SX-727
SN: TE3729669

One of my customers brought in this beautiful vintage receiver for restoration. It has been taken with care and is still in a perfect cosmetic condition but has some issues typical for 40-50 years old electronic equipment. Most original incandescent bulbs burned out, the stereo indicator bulb was replaced before but burned out again, all pots and switches are dirty and/or oxidized due to age. The SELECTOR switch was mostly affected in this receiver and didn't work properly when a PHONO source was selected. As a result, it was impossible to get a clear sound from a turntable. I restored this beautiful receiver and serviced all boards except a tuner section. Well, the tuner board was also serviced but I just replaced the electrolytic capacitors installed in a signal path on this board. It is usually safe to do and will not require any tuner re-alignment.

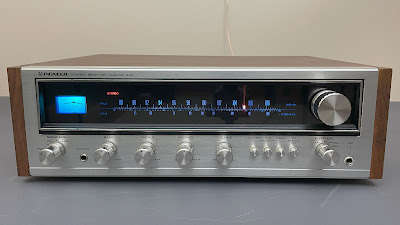
Pioneer SX-727_After restoration_01

The Pioneer SX-727 was introduced in 1972 and delivers 37 watts per channel into 8 ohms with total harmonic distortion under 0.5%. It is a great mid-range receiver with a very sensitive and selective FM section offering distortion-free reception. A low noise field effect transistor in the first stage and a two-step RF amplifier provide an excellent sensitivity of 1.8 micro-volts (!) and a high signal-to-noise ratio of 70dB. I was able to get a stable stereo reception even without any external FM antenna attached! The SX-727 has terminals to connect two turntables, two tape decks, three pairs of speaker systems, and a microphone. The walnut-finish wooden cabinet looks beautiful and the build quality is excellent. A test report on the Pioneer SX-727 completed by the Hirsch-Houck Lab was published in Stereo Review magazine (July 1972, p. 34). The list price in 1972 was $349.95 (Ref. Stereo Review, March 1972, page 1). According to the Pioneer database, this unit was manufactured in May 1973.

Power Supply Board

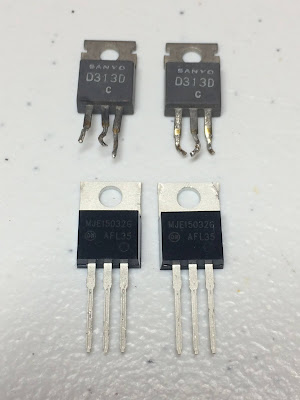
The power supply circuit (#AWR-011) in Pioneer SX-727 has a similar design as a power supply circuit (#AWR-010) in Pioneer SX-828. And as might be expected both boards have similar problems. Two transistors Q1 and Q3, and the resistor R9 are running very hot on this board under normal operating conditions. The heat sink attached to transistors Q1 and Q3 is secured by a nylon screw. Due to high temperature and aging, this screw becomes brittle over time and easily breaks down. The metal oxide resistor R9 has a rated power of 2W which is usually not enough to efficiently dissipate the electrical power as heat. As a result, the part of PCB around this resistor is often found damaged. I replaced resistor R9 with a flameproof 3W metal oxide resistor to improve its heat dissipation. Also, it always makes sense to replace transistors Q1 and Q3 with Fairchild MJE transistors due to better thermal characteristics in comparison to original transistors. Five electrolytic capacitors C6, C7, C9, C10, and C11 were replaced with low impedance and high-reliability Nichicon UPW/UPM caps. The maximum operating temperature of new electrolytic capacitors is +105C which is also beneficial in power supply circuits. The original e-caps installed in vintage gears from the 70's have a maximum operating temperature of +85C.

Power supply board (#AWR-011) - PCB discoloration due to excessive heat from resistor R9

Pioneer SX-727_PCB discoloration due to extensive heat from resistor R9

Original Sanyo power transistor and modern Fairchild MJE substitution

Pioneer SX-727_Original Sanyo power transistors and new Fairchild MJE substitutions

Power supply board (#AWR-011) - before and after

Pioneer SX-727_Power Supply Board_Before servicing

Pioneer SX-727_Power Supply Board_After servicing

Protection Board

There are two versions of the protection board in Pioneer SX-727: #AWM-011 (early version) and #AWM-027 (later version). This receiver has the later version of the protection board. Also, the later version (#AWM-027) has several modifications and this particular one has two capacitors C1 and C2 as 0.22uF/10V electrolytic caps instead of Mylar caps. These two caps are the notorious sky blue Sanyo e-caps. These e-caps have a bad reputation to become very leaky over time. For more information about sky blue Sanyo e-caps refer to my previous post on Pioneer SX-828 restoration. I replaced C1 and C2 with high-quality film polyester Kemet caps. The remaining e-caps C3 thru C6 were replaced with low impedance and high-reliability Nichicon UPW caps.

Protection board (#AWM-027) - before and after

Pioneer SX-727_Protection Board #AWM-027_Before servicing

Pioneer SX-727_Protection Board #AWM-027_After servicing

Head Amplifier Board

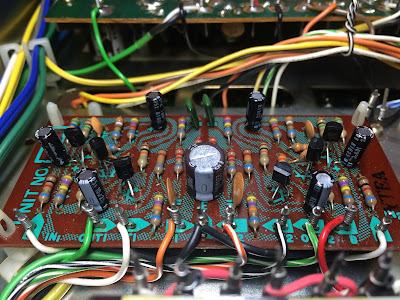
The head amplifier board in Pioneer SX-727 has six NPN transistors Q1 thru Q6. According to the service manual, these transistors could be either 2SC871 or 2SC458. However, in some units, the 2SC1312 transistor can be also found in these positions. All of these transistors are known to become very noisy over time. I replaced six original 2SC1312 transistors installed in this receiver with modern low noise Fairchild KSC1845. All new transistors were carefully matched by current gain and base-emitter voltage within 1%. Watch the pinout on replacement transistors while servicing this board. The original transistor is BCE and the new one is ECB.

Electrolytic capacitors C1/C2 and C5/C6 installed in the signal path were replaced with low leakage Nichicon UKL caps. The remaining e-caps C3/C4 and C15 were replaced with low impedance and high-reliability Nichicon UPW caps.

Head amplifier board (#W21-002) - before and after

Pioneer SX-727_Head Amplifier Board_Before servicing

Pioneer SX-727_Head Amplifier Board_After servicing

AF Amplifier Board

The most difficult circuit board to work on in Pioneer SX-727 is an AF amplifier board (#AWK-010). This is a double solder PCB and requires a lot of patience while unsoldering and soldering the electronic components. There is always a risk of overheating and damaging this board while unsoldering electronic components. So, take your time and be very careful while servicing the AF amplifier board. 

All original coupling capacitors C13/C14, C21/C22, and C27/C28 installed on this board are the notorious sky blue Sanyo electrolytic caps. I replaced e-caps C13/C14 and C21/C22 with low leakage Nichicon UKL caps. The e-caps C27/C28 are rated at 1uF/25V and I replaced them with high-quality film polyester WIMA MKS2 caps. In general, I replace all electrolytic capacitors with capacitance from 0.1uF to 1uF with film polyester caps. The remaining eight e-caps on this board were replaced with low impedance and high-reliability Nichicon UPW caps.

Two NPN transistors Q5 and Q6 installed on this board are 2SC1312. I replaced them with modern low noise Fairchild KSC1845. Watch the pinout on replacement transistors. The original transistor is BCE and the new one is ECB. I also replaced two PNP transistors Q3 and Q4 with modern low noise Fairchild KSA992. The original PNP transistors are 2SA725 and become very noisy over time.

The access to the pots and switches installed on the AF amplifier board is very limited when it is assembled to the chassis. But everything can be easily cleaned when it is disassembled from the chassis. I used the DeoxIT 5% as a contact cleaner and DeoxIT FaderLube 5% spray for subsequent lubrication. 

AF amplifier board (#AWK-010) - before servicing

Pioneer SX-727_AF Amp Board #AWK-010_Before servicing

Pioneer SX-727_AF Amp Board #AWK-010_Before servicing_right side

Pioneer SX-727_AF Amp Board #AWK-010_Before servicing_left side

AF amplifier board (#AWK-010) - after servicing

Pioneer SX-727_AF Amp Board #AWK-010_After servicing

Pioneer SX-727_AF Amp Board #AWK-010_After servicing_right side

Pioneer SX-727_AF Amp Board #AWK-010_After servicing_left side

Power Amplifier Board

The power amplifier board (#AWH-011) has six electrolytic capacitors C7 thru C10, C15, and C16. I replaced two e-caps C7 and C8 with low leakage Nichicon UKL caps. The remaining four e-caps were replaced with low impedance and high-reliability Nichicon UPW/UPM caps. As can be seen from the test results four out of six e-caps on this board are out of factory spec. 

Test results on original capacitors removed from Power Amplifier board:

C7: rated capacitance – 22uF, measured capacitance – 31uF, deviation: +41% (out of spec)
C8: rated capacitance – 22uF, measured capacitance – 30uF, deviation: +36% (out of spec)
C9: rated capacitance – 220uF, measured capacitance – 307uF, deviation: +40% (out of spec)
C10: rated capacitance – 220uF, measured capacitance – 323uF, deviation: +47% (out of spec)
C15: rated capacitance – 100uF, measured capacitance – 106uF, deviation: +6% (Okay)
C16: rated capacitance – 100uF, measured capacitance – 106uF, deviation: +6% (Okay)

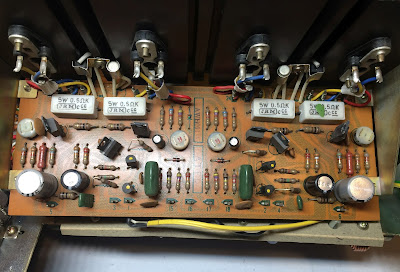
Two NPN transistors Q5 and Q6 installed on the power amplifier board are Sony 2SC1124. The current gain in the 2SC1124 transistor degrades with age. The modern substitution is a Fairchild KSC2690A transistor. I replaced the original Sony transistors with KSC2690A to prevent any issues in the future. Watch the pinout on replacement transistors. The original transistor is EBC and the new one is ECB.

Power amplifier board (#AWH-011) - before and after

Pioneer SX-727_Power Amplifier Board_Before servicing

Pioneer SX-727_Power Amplifier Board_After servicing

Dial and Meter Lamps

Two fuse-type lamps installed behind the tuning and signal strength meters are relatively easy to change in Pioneer SX-727. Just unscrew two small screws on the top and the lamp holder will be easily released from the chassis. The original incandescent bulbs installed in the lamp holder usually overheat the plastic on the meters and discolors it. As a result, the plastic often becomes yellowish. One possible solution to overcome this issue is to install cool blue LED lamps. These LED lamps are brighter than original incandescent bulbs but generate almost no heat and virtually last forever.

Original incandescent bulbs installed behind the tuning and signal strength meters

Pioneer SX-727_Tuning and Signal Strength_Original Bulbs

New cool blue LED lamps installed

Pioneer SX-727_Tuning and Signal Strength_Cool Blue LEDs

Yellowish plastic due to extensive heat from original incandescent bulbs

Pioneer SX-727_Tuning and Signal Strength_Yellowish Plastic

To replace 5 dial lamps I pulled off all knobs from shafts, removed nuts and washers from their shafts, removed a faceplate, and then carefully removed four clips holding a dial scale. This process is similar to that I described in detail during the Pioneer SX-828 restoration

New cool blue LED lamps installed

Pioneer SX-727_New Cool Blue LEDs installed

Pioneer SX-727_Old incandescent bulbs and new LED lamps

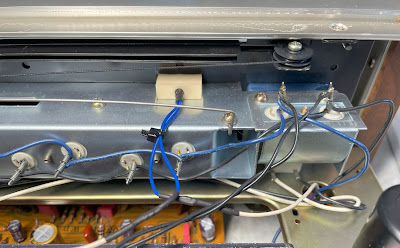
The original stereo indicator bulb in this unit was replaced by somebody in the past but burned out again. It looks like the technician or whoever he was doesn't possess good soldering skills as can be seen in the photo below. I installed a warm white LED lamp here and secured it with super glue. The new LED lamp will virtually last forever.

Stereo indicator bulb replaced by somebody in the past - sloppy work!

Pioneer SX-727_Stereo Indicator Bulb_Replaced by somebody in the past

Stereo indicator bulb replaced with warm white LED lamp

Pioneer SX-727_Stereo Indicator_New LED lamp

Bias and DC Offset Adjustments

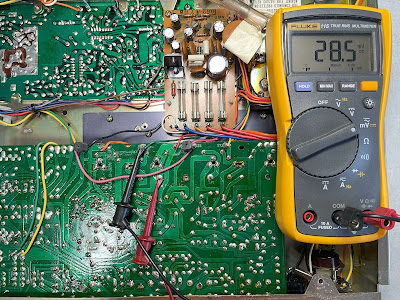
At the end of my restoration, I checked and adjusted the Bias and DC offset on the power amplifier unit. The service manual has no description for these adjustments but this procedure is pretty much straightforward.

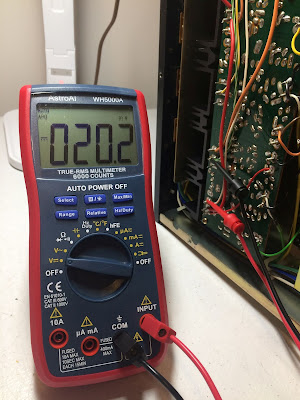
The bias is measured between pins 11 and 13 on the left channel, and between pins 12 and 14 on the right channel. It should be adjusted to ~20mV with trimmer VR3 and VR4, respectively. 

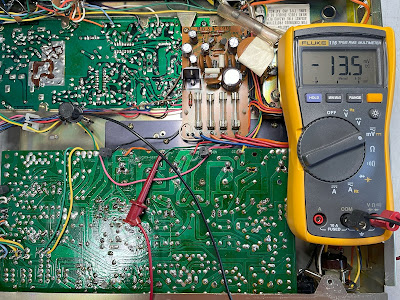
The DC offset is measured between pin 5 and ground on the left channel, and between pin 6 and ground on the right channel. It should be adjusted as close to zero volts as possible with trimmer VR1 and VR2, respectively.

Bias on the left and right channel after restoration

Pioneer SX-727_Bias_Left channel_between pins 11 and 13

Pioneer SX-727_Bias_Right channel_between pins 12 and 14

DC offset on the left and right channel after restoration

Pioneer SX-727_DC Offset_Left channel_between pin 5 and ground

Pioneer SX-727_DC Offset_Right channel_between pin 6 and ground

The final result can be seen in the photos below. The receiver looks beautiful and has enough power to fill a large room with great sound. Please watch a short demo video at the end of this post. Thank you for reading.

Pioneer SX-727 - before restoration

Pioneer SX-727_Before restoration

Pioneer SX-727 - after restoration
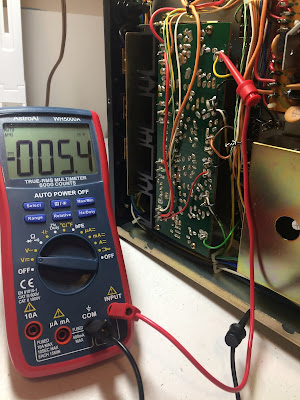
Pioneer SX-727_After restoration with replaced components

Pioneer SX-727_Replaced components

Pioneer SX-727_After restoration_01

Pioneer SX-727_After restoration_02

Demo video after repair & restoration

Sunday, January 3, 2021

Pioneer SX-434 Receiver Restoration

Unit: AM/FM Stereo Receiver
Manufacturer: Pioneer
Model: SX-434
SN: WB3943648Y

Today I'm showcasing a Pioneer SX-434 receiver that came in for restoration. The SX-434 is Pioneer's budget-priced stereo receiver. It produces only 15 watts per channel into 8 ohms but has an excellent build quality and a very sensitive FM tuner with low noise FET and 3-gang frequency linear variable capacitor. The total harmonic distortion is less than 0.8%. The SX-434 was manufactured from 1974 to 1976. It is a very nice-looking receiver with a warm and rich sound. According to the Pioneer database, this particular unit was manufactured in February 1976.

Pioneer SX-434_After Restoration_Side view

Power Supply Board

The power supply board (#AWR-062) has 6 electrolytic capacitors C7 thru C12. All of them were replaced with low impedance and high-reliability Nichicon UPW/UPM caps. This board is easy to service but one should be careful with old nylon snap lock supports. They become stiff over time and can be easily broken if too much force is applied to release the board from the chassis.

Power supply board - before and after

Pioneer SX-434_Power Supply board - Before servicing

Pioneer SX-434_Power Supply board - After servicing

AF Amplifier Board

The cleaning and lubricating of all pots and switches are routine work on any vintage gear. Some make/models have very easy access to pots/switches by design, and it usually takes just 10-15 minutes to thoroughly clean all of them. However, in some models, this routine work could be a real challenge. The Pioneer SX-434 is one of them. It is impossible to clean the pots and switches in this model without disassembling the AF amplifier board from the chassis. In addition, it is a little bit tricky to take it out due to the large heat sink with an unusual shape. The function switch was loosened and the headphone jack was removed from the chassis to facilitate this process. Moreover, the power supply board was also removed from the chassis since one screw holding the heat sink is located just under the power supply board! Anyway, after the board was successfully disassembled from the chassis I thoroughly cleaned all pots and switches with DeoxIT 5% contact cleaner and lubricated them with DeoxIT FaderLube 5% spray.

The original coupling capacitors installed on the AF amplifier board (#AWK-034) are the notorious sky blue Sanyo e-caps. These e-caps become very leaky over time and I always prefer to replace them with modern film capacitors. For more information about sky blue Sanyo e-caps refer to my previous post on Pioneer SX-828 restoration. I replaced all sky blue Sanyo e-caps C1/C2, C17/C18, C23/C24, C35 thru C38 with high-quality film polyester WIMA MKS2 caps. Two low leakage e-caps C11 and C12 were replaced with modern low leakage Nichicon UKL caps. The remaining ten e-caps C41 thru C44, C51, C52, C55 thru C58 were replaced with low impedance and high-reliability Nichicon UPW caps.

The differential pair amplifier in each channel consists of two notorious transistors 2SA725. Those transistors Q10/Q12 (left channel) and Q11/Q13 (right channel) become very noisy over time and should be replaced. A modern substitution for 2SA725 is the Fairchild KSA992 transistor. I replaced all 4 transistors and carefully matched each pair of KSA992 transistors by current gain and base-emitter voltage before installation.

AF amplifier board - disassembled from the chassis

Pioneer SX-434_AF Amplifier board

AF amplifier board - before and after (two orange e-caps are low leakage, ten sky blue are Sanyo e-caps)

Pioneer SX-434_AF Amplifier board_Before servicing

Pioneer SX-434_AF Amplifier board_After servicing

Dial and Tuning Meter Lamps

Replacing the dial and tuning meter lamps in SX-434 is a very easy task. To release a lamp box holding the dial and meter bulbs one should just unscrew two small screws on the top of the lamp box. And then carefully remove it from the chassis. I replaced the original dial bulbs with warm white LED lamps to maintain the original look and decrease heat. The original incandescent bulb installed for the tuning meter usually overheats the plastic on the meter and discolors it. As a result, the plastic often becomes yellowish. I replaced the original tuning meter bulb with a cool blue LED lamp to overcome this issue and better match the tuning meter to the rest of the dial.

The stereo indicator bulb burned out in this unit and I replaced it with a new incandescent bulb. This is a very delicate work since the original rubber holder dries out over time and eventually becomes very brittle. I used an X-ACTO #2 Knife to remove the original bulb from the holder carefully trimming around the bulb. The diameter of the new incandescent bulb is smaller than the original one and to compensate for the difference I put on a heat shrink on a new bulb. After that, the new incandescent bulb was inserted into the holder and secured with super glue.

The dial pointer bulb burned out in this unit as well and it was probably the most challenging work for me in this model. It is not so easy to replace a burned-out dial pointer bulb in Pioneer SX-434. Ideally, the dial pointer holder should be removed from the dial panel before bulb replacement. But in that case, the holder should be disassembled from the dial string. I didn't want to break the factory sealing and decided to replace the burned bulb without disassembling the dial pointer holder from the dial string. Well, I wouldn't say it is an easy task but it is doable with extra care and with the right tools. I used an X-ACTO #2 Knife again and small pliers to release a plastic dial holder from the metal part. Be extra cautious during this step if you need to replace a dial pointer bulb in this model. It is very easy to break a plastic needle. I was patient and lucky. The plastic needle was not broken and I successfully replaced the old bulb with a new one!  

Five new warm white LED lamps and one cool blue LED lamp installed

Pioneer SX-434_New warm white LED lamps installed

New stereo indicator lamp installed

Pioneer SX-434_New Stereo Indicator Lamp

Original dial pointer bulb - removed from the plastic holder

Pioneer SX-434_Dial Pointer Bulb_Removed from the holder

New dial pointer bulb installed - we have light!

Pioneer SX-434_New Dial Pointer Bulb Installed

DC offset and Bias Adjustments

The service manual describes step-by-step the power amplifier alignment but these instructions could be confusing for someone who is not familiar with this model. The problem is that this receiver has no trimmers to adjust the DC offset or Bias. Instead, it has three jumpers per channel which should be cut to make a correct alignment. 

The first step is to check a DC offset. To do this I loaded this receiver with two low inductance 8Ω/100W dummy resistors in each channel and connected my DC voltmeter between terminal #27 and ground. The measured voltage was ~13mV which is perfectly normal. Then, I connected the DC voltmeter between terminal #24 and the ground. The measured voltage was ~5mV which is again in an acceptable range. Ideally, the measured voltage should be as close as possible to zero volts. But in real life, any DC voltage between 0V and ~30mV would be just fine. So, I didn't cut any jumpers and left them alone. However, if the measured voltage is above 40-50mV then the correct jumper lead should be cut to get the DC offset close to zero volts. Jumper C should be cut if the DC voltmeter reads a positive voltage between terminal #27 and ground (i.e. > +50mV). Jumper E should be cut if the DC voltmeter reads a negative voltage between terminal #27 and ground (i.e. > -50mV). Jumpers D or F should be cut if a positive or negative voltage is measured between terminal #24 and the ground.

DC offset on the left and right channel after restoration
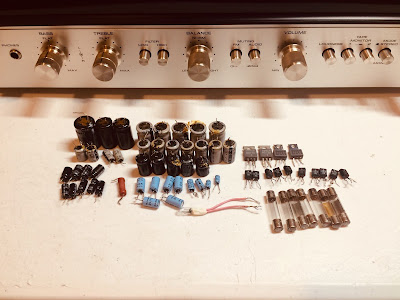
Pioneer SX-434_DC Offset_Left channel

Pioneer SX-434_DC Offset_Right channel

The second step is to check a Bias.  According to the service manual, the bias should be above 5mV otherwise the jumper lead should be cut. I connected my DC voltmeter between terminals TP1 and 27. The measured voltage was 7.6mV which is above the minimal voltage stated in the service manual. The measured voltage between terminal number TP2 and 24 was 8.3mV which is again in an acceptable range. So, no jumpers were cut here as well. If the measured voltage between terminal number TP1 (TP2) and 27 (24) is less than 5mV then the jumper A (B) should be cut.

Bias on the left and right channel after restoration

Pioneer SX-434_Bias_Left channel

Pioneer SX-434_Bias_Right channel

As usual, all the knobs and the faceplate were gently cleaned in warm water with dish soap. All knobs were also slightly polished by Mothers Mag & Aluminum polish to remove some small spots of aluminum oxidation.

The final result can be seen in the photos below. As I mentioned earlier this receiver has a very warm and rich sound. And it looks very cool too! Please watch a short demo video at the end of this post. Thank you for reading.

Pioneer SX-434 - after restoration

Pioneer SX-434_After Restoration_01

Pioneer SX-434_After Restoration_With replaced components

Pioneer SX-434_After Restoration_Side view

Demo video after repair & restoration