Home

Sunday, January 2, 2022

Pioneer SX-1010 Receiver Restoration

Unit: AM/FM Stereo Receiver
Manufacturer: Pioneer
Model: SX-1010
SN: UA3902361M

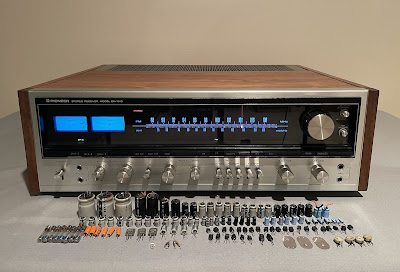
Today I'm showcasing a Pioneer SX-1010 stereo receiver that came in for restoration. This is the first real "Monster" receiver introduced to the market in 1974. The SX-1010 is Pioneer's top-of-the-line AM/FM stereo receiver and an important milestone in the history of Hi-Fi audio equipment. This iconic piece of equipment actually triggered the Monster receivers war of the 70's. It produces 100W + 100W continuous RMS power (both channels driven at 8 ohms) with a total harmonic distortion of less than 0.1%, throughout the entire audible spectrum from 20Hz to 20kHz. Power is maintained smoothly and continuously with a direct-coupled circuit driven by dual power supplies. The list price in 1974 was $699.95 (Ref. High Fidelity Magazine, April 1974, page 101).

According to the Pioneer database, this particular unit was manufactured in January 1974.

Pioneer SX-1010_After restoration

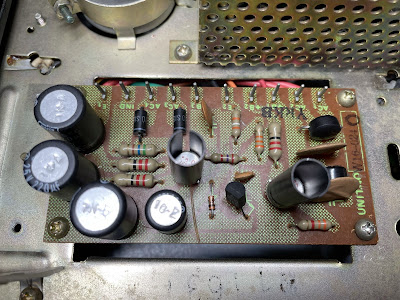
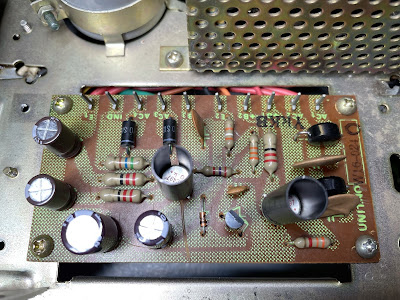
Power Supply Board (AWR-054-A)

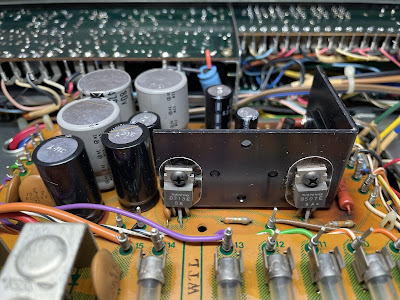
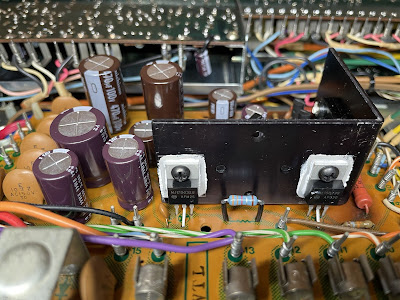
The power supply board (AWR-054-A) has eleven aluminum electrolytic capacitors C8 thru C14 and C18 thru C21. I replaced them with low impedance and high-reliability Nichicon UPW/UPM caps. The max operating voltage on all new e-caps was increased one step up. The original e-caps removed from this board were tested with an Atlas ESR70 capacitance meter and the results are below. Three out of eleven original e-caps are outside the factory capacitance tolerance +/- 20%. And the other two e-caps failed the test (open circuit/low capacitance)! Yes, the power supply board in Pioneer SX-1010 works under extreme operating conditions and after 47 years of operation, it's pretty well toasted.

Test results on original capacitors removed from the power supply board:

C8: rated capacitance – 470uF, measured – 554uF, ESR – 0.01Ω, deviation: +18%
C9: rated capacitance – 470uF, measured – 508uF, ESR – 0.01Ω, deviation: +8%
C10: rated capacitance – 100uF, measured – 111uF, ESR – 0.25Ω, deviation: +11%
C11: rated capacitance – 100uF, measured – 112uF, ESR – 0.32Ω, deviation: +12%
C12: rated capacitance – 100uF, measured – open circuit/low capacitance
C13: rated capacitance – 100uF, measured – 72uF, ESR – 0.71Ω, deviation: -28%
C14: rated capacitance – 47uF, measured – open circuit/low capacitance
C18: rated capacitance – 1000uF, measured – 1064uF, ESR – 0.01Ω, deviation: +6%
C19: rated capacitance – 220uF, measured – 233uF, ESR – 0.21Ω, deviation: +6%
C20: rated capacitance – 2200uF, measured – 2946uF, ESR – 0.01Ω, deviation: +34%
C21: rated capacitance – 2200uF, measured – 2823uF, ESR – 0.01Ω, deviation: +28%

Four original carbon film resistors R11, R12, R20, and R22 were replaced on this board with new KOA Speer metal film resistors. The power rating was increased from 1/4W to 1/2W. Also, the new resistors were lifted off the board about a half-inch to improve heat dissipation and protect the PCB.

To improve the reliability of the power supply, I also decided to replace all transistors on this board. They should be retired after working hard for the last 47 years. Below is a list of original and replacement transistors I used. Three transistors Q1, Q4, and Q7 are mounted on the heat sink. The old thermal pads were replaced with new Mica ones. The old thermal compound was refreshed with a new silicone thermal compound (Wakefield-Vette, 120 series).

Q1: NPN, 2SD313 (original), replaced with a new Fairchild MJE15032G
Q2: NPN, 2SC869 (original), replaced with a new Fairchild KSC2383YTA
Q3: NPN, 2SC869 (original), replaced with a new Fairchild KSC2383YTA
Q4: PNP, 2SB507 (original), replaced with a new Fairchild MJE15033G
Q5: PNP, 2SA628A (original), replaced with a new Fairchild KSA1013YBU
Q6: PNP, 2SA628A (original), replaced with a new Fairchild KSA1013YBU
Q7: NPN, 2SD313 (original), replaced with a new Fairchild MJE15032G
Q8: NPN, 2SC1384 (original), replaced with a new Fairchild KSC2690AYSTU

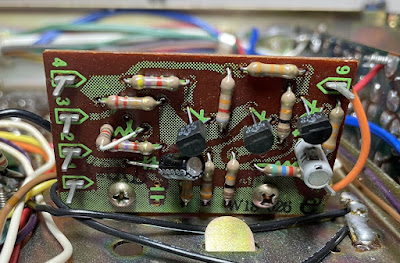
Power supply board - before servicing

Pioneer SX-1010_Power Supply Board (AWR-054-A)_before servicing_01

Pioneer SX-1010_Power Supply Board (AWR-054-A)_before servicing_02

Pioneer SX-1010_Power Supply Board (AWR-054-A)_before servicing_03

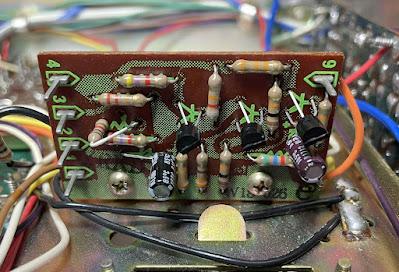
Power supply board - after servicing

Pioneer SX-1010_Power Supply Board (AWR-054-A)_after servicing_01

Pioneer SX-1010_Power Supply Board (AWR-054-A)_after servicing_02

Pioneer SX-1010_Power Supply Board (AWR-054-A)_after servicing_03

Control Amplifier Board (AWG-027-0)

The control amplifier board in Pioneer SX-1010 is impossible to service without removing it from the chassis. To do it one should remove the front panel, unscrew 6 screws from the sub-chassis and finally remove the shield cover.

This board has six coupling capacitors (C1, C2, C13, C14, C47, C48), four low leakage e-caps (C23, C24, C39, C40) and eighteen aluminum electrolytic capacitors (C7, C8, C15, C16, C25, C26, C29, C30, C31, C32, C41, C42, C45, C46, C49, C50, C51, C52). Also, the additional filtering aluminum e-cap (47uF/25V) is soldered between resistor R61 and ground (pin 2) in the left channel, and between resistor R62 and ground (pin 11) in the right channel. All coupling capacitors are the notorious sky blue Sanyo e-caps. These e-caps become very leaky over time and eventually fail. They should be always replaced with no questions. The coupling capacitors C1 and C 2 were replaced with high-quality film polyester WIMA MKS2 caps. The other four coupling capacitors (C13, C14, C47, C48) and original low leakage e-caps (C23, C24, C39, C40) were replaced with modern low leakage Nichicon UKL caps. The remaining aluminum e-caps were replaced with low impedance Nichicon UPW/UPM caps.

Test results on original capacitors removed from control amplifier board:

C1: rated capacitance – 0.33uF, measured – 0.42uF, ESR – N/A, deviation: +27%
C2: rated capacitance – 0.33uF, measured – 0.46uF, ESR – N/A, deviation: +39%
C7: rated capacitance – 100uF, measured – 109uF, ESR – 0.3Ω, deviation: +9%
C8: rated capacitance – 100uF, measured – 112uF, ESR – 0.3Ω, deviation: +12%
C13: rated capacitance – 2.2uF, measured – 2.8uF, ESR – 3.4Ω, deviation: +27%
C14: rated capacitance – 2.2uF, measured – 2.2uF, ESR – 5.4Ω, deviation: 0%
C15: rated capacitance – 4.7uF, measured – 6.0uF, ESR – 1.1Ω, deviation: +28%
C16: rated capacitance – 4.7uF, measured – 6.3uF, ESR – 1.1Ω, deviation: +34%
C23: rated capacitance – 4.7uF, measured – 4.4uF, ESR – 4.3Ω, deviation: -6%
C24: rated capacitance – 4.7uF, measured – 5.1uF, ESR – 3.2Ω, deviation: +9%
C25: rated capacitance – 10uF, measured – 11uF, ESR – 0.9Ω, deviation: +10%
C26: rated capacitance – 10uF, measured – 12uF, ESR – 0.7Ω, deviation: +20%
C29: rated capacitance – 100uF, measured – 115uF, ESR – 0.2Ω, deviation: +15%
C30: rated capacitance – 100uF, measured – 111uF, ESR – 0.3Ω, deviation: +11%
C31: rated capacitance – 4.7uF, measured – 6.3uF, ESR – 1.2Ω, deviation: +34%
C32: rated capacitance – 4.7uF, measured – 6.1uF, ESR – 1.1Ω, deviation: +30%
C39: rated capacitance – 4.7uF, measured – 4.8uF, ESR – 5.1Ω, deviation: +2%
C40: rated capacitance – 4.7uF, measured – 4.4uF, ESR – 3.1Ω, deviation: -6%
C41: rated capacitance – 10uF, measured – 12uF, ESR – 0.7Ω, deviation: +20%
C42: rated capacitance – 10uF, measured – 11uF, ESR – 0.7Ω, deviation: +10%
C45: rated capacitance – 100uF, measured – 113uF, ESR – 0.3Ω, deviation: +13%
C46: rated capacitance – 100uF, measured – 111uF, ESR – 0.2Ω, deviation: +11%
C47: rated capacitance – 2.2uF, measured – 2.7uF, ESR – 5.2Ω, deviation: +23%
C48: rated capacitance – 2.2uF, measured – 2.8uF, ESR – 3.4Ω, deviation: +27%
C49: rated capacitance – 47uF, measured – 51uF, ESR – 0.3Ω, deviation: +9%
C50: rated capacitance – 47uF, measured – 54uF, ESR – 0.3Ω, deviation: +15%
C51: rated capacitance – 47uF, measured – 53uF, ESR – 0.3Ω, deviation: +13%
C52: rated capacitance – 47uF, measured – 52uF, ESR – 0.4Ω, deviation: +11%
CX1: rated capacitance – 47uF, measured – 55uF, ESR – 0.2Ω, deviation: +17%
CX2: rated capacitance – 47uF, measured – 51uF, ESR – 0.2Ω, deviation: +9%

Two original PNP transistors (Q1 and Q2) installed on this board are 2SA725. These transistors are known to become very noisy over time. I replaced them with modern low noise Fairchild KSA992. Watch the pinout on replacement transistors. The original transistor is BCE and the new one is ECB.

The original NPN transistors (Q3 thru Q8) are 2SC1312. These are also known as noisy/leaky transistors. I replaced them with modern low noise Fairchild KSA1845. Watch the pinout on replacement transistors. The original transistor is BCE and the new one is ECB.

All controls were cleaned with DeoxIT 5% contact cleaner and lubricated with DeoxIT FaderLube 5% spray.

Control amplifier board - before and after

Pioneer SX-1010_Control Amp (AWG-027-0)_before servicing

Pioneer SX-1010_Control Amp (AWG-027-0)_after servicing

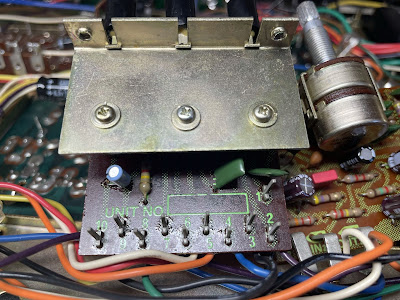
Protection Unit Board (AWM-062-0)

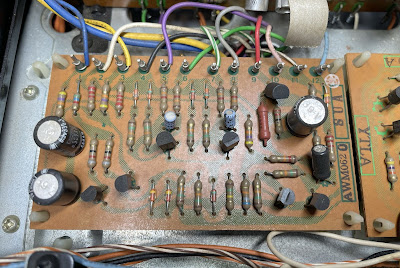
The protection unit has two coupling capacitors (C1, C2) and four aluminum electrolytic capacitors (C3 thru C6). The coupling capacitors are the notorious sky blue Sanyo e-caps. I replaced them with high-quality film polyester Kemet caps. The remaining aluminum e-caps were replaced with low impedance Nichicon UPW caps.

Test results on original capacitors removed from protection unit board:

C1: rated capacitance – 0.22uF, measured – 0.26uF, ESR – N/A, deviation: +18%
C2: rated capacitance – 0.22uF, measured – 0.31uF, ESR – N/A, deviation: +41%
C3: rated capacitance – 330uF, measured – 431uF, ESR – 0.06Ω, deviation: +31%
C4: rated capacitance – 330uF, measured – 427uF, ESR – 0.06Ω, deviation: +29%
C5: rated capacitance – 4.7uF, measured – 5.7uF, ESR – 1.3Ω, deviation: +21%
C6: rated capacitance – 100uF, measured – 138uF, ESR – 0.12Ω, deviation: +38%

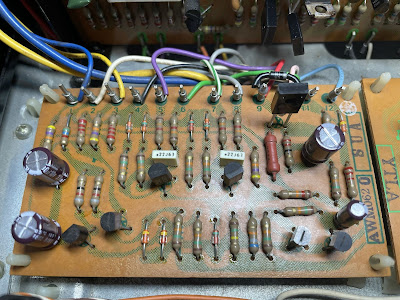
The relay driver transistor Q7 suffers from the current spike every time the relay turns off. Eventually, it fails due to severe degradation. I replaced the original 2SC1384 transistor installed in this position with a new Fairchild KSC2690. Also, a fly-back safety diode (1N4004G) was added to the circuit to prevent potential output damage. The safety diode was soldered between pins 9 (anode, "+") and 10 (cathode, "-").

Protection unit - before and after

Pioneer SX-1010_Protection Unit Board (AWM-062-0)_before servicing

Pioneer SX-1010_Protection Unit Board (AWM-062-0)_after servicing

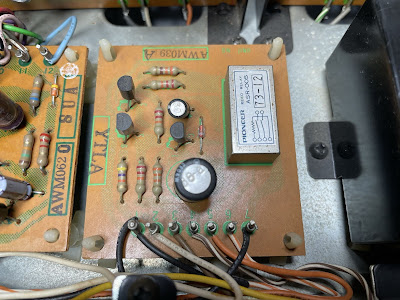
Muting Unit Board (AWM-039-A)

The muting unit has only two aluminum electrolytic capacitors: C1 and C2. I replaced the e-cap C1 with a film polyester WIMA MKS2 cap and e-cap C2 with a low impedance Nichicon UPW cap.

Test results on original capacitors removed from muting unit board:

C1: rated capacitance – 0.47uF, measured – 0.57uF, ESR – N/A, deviation: +21%
C2: rated capacitance – 47uF, measured – 48uF, ESR – 0.14Ω, deviation: +2%

The relay driver transistor Q3 installed on this board is 2SC1318. This transistor is on my prone to failure list, and I replaced it with a modern Fairchild KSC2383. The original and new transistors have the same pinout.

Muting unit - before and after

Pioneer SX-1010_Muting Unit (AWM-039-A)_before servicing

Pioneer SX-1010_Muting Unit (AWM-039-A)_after servicing

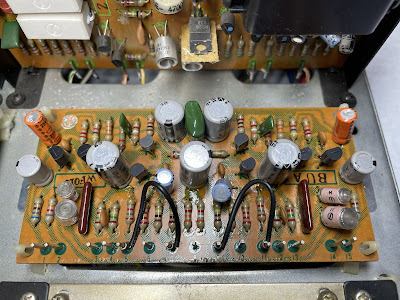
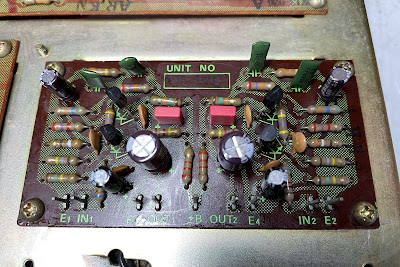
Equalizer Amplifier Board (AWF-013-0)

The equalizer amplifier (AWF-013-0) is a three-stage differential direct-coupled amplifier. The stability of the equalizer is maximized by a first-stage differential amplifier with 100% DC negative feedback. As a result, the distortion is very low over a wide frequency range from 20Hz to 20kHz. A plus-minus split power supply maintains precisely zero potential at its input and output points.

The equalizer amplifier board (AWF-013-0) has two coupling capacitors (C1, C2) installed in the input signal path, two low leakage e-caps (C11, C12) installed in the output signal path, and seven aluminum e-caps (C5, C6, C9, C10, C19, C20, C21). The original coupling capacitors are the notorious sky blue Sanyo e-caps and I replaced them with modern low leakage Nichicon UKL caps. The original low leakage e-caps installed in the output signal path were also replaced with Nichicon UKL caps. 

There is a discrepancy between the service manual and the original capacitors installed on this board. According to the service manual, the seven remaining e-caps (C5, C6, C9, C10, C19, C20, C21) are supposed to be low leakage capacitors (CEANL part number in the manual). However, all of them are ordinary aluminum electrolytic capacitors (CEA part number). I decided to stick with the service manual and replace all of them with low leakage Nichicon UKL caps. It will lower the circuit's noise floor, which is very important for the phono stage.

Test results on original capacitors removed from equalizer amplifier board:

C1: rated capacitance – 2.2uF, measured – 2.4uF, ESR – 3.0Ω, deviation: +9%
C2: rated capacitance – 2.2uF, measured – 2.5uF, ESR – 3.0Ω, deviation: +14%
C5: rated capacitance – 470uF, measured – 582uF, ESR – 0.01Ω, deviation: +24%
C6: rated capacitance – 470uF, measured – 585uF, ESR – 0.04Ω, deviation: +25%
C9: rated capacitance – 100uF, measured – 119uF, ESR – 0.46Ω, deviation: +19%
C10: rated capacitance – 100uF, measured – 115uF, ESR – 0.61Ω, deviation: +15%
C11: rated capacitance – 10uF, measured – 12uF, ESR – 1.3Ω, deviation: +20%
C12: rated capacitance – 10uF, measured – 13uF, ESR – 0.76Ω, deviation: +30%
C19: rated capacitance – 100uF, measured – 107uF, ESR – 0.12Ω, deviation: +7%
C20: rated capacitance – 100uF, measured – 111uF, ESR – 0.32Ω, deviation: +11%
C21: rated capacitance – 220uF, measured – 252uF, ESR – 0.04Ω, deviation: +15%

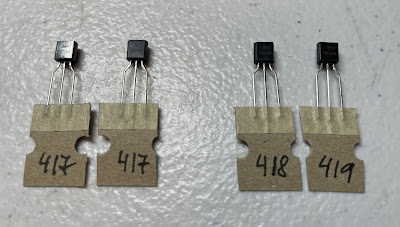
The first stage of the equalizer amplifier is a differential amplifier consisting of two amplifying transistors with a common emitter: Q1/Q3 (left channel) and Q2/Q4 (right channel). The original PNP transistors installed in these positions are 2SA763P. This transistor is not on my prone to failure transistors list but it is often found bad. I decided to replace all 2SA763P transistors as a part of "preventive maintenance". And it was a smart decision! The original transistors were unsoldered from the board and tested with Atlas DCA55 semiconductor analyzer. All four revealed a relatively low current gain. According to the service manual, the 2SA763P transistor installed in the differential pair should have a rank of 5 or 6. Based on the transistor datasheet the current gain for rank 5 is from 250 to 500, and for rank 6 is from 400 to 800. All original 2SA763P transistors on this board have rank 5 but the current gain is below 250 on two transistors (Q1 and Q4, see the testing data below). In addition, each pair of transistors were not well matched. Transistor matching is very important in a differential pair amplifier for normal operating. So, I replaced these transistors with modern low-noise Fairchild KSA992. Before installation, each pair of KSA992 transistors was carefully matched by current gain and base-emitter voltage. Below are test results on four original transistors removed from the board along with test results on four new closely matched transistors. As one can see each pair of original transistors is poorly matched by current gain.

Test results on original transistors 2SA763P:

Left channel: Q1 (gain - 173, Vbe - 0.756V), Q3 (gain - 278, Vbe - 0.752V)
Right channel: Q2 (gain - 283, Vbe - 0.779V), Q4 (gain - 226, Vbe - 0.754V)

Test results on new closely matched transistors KSA992:

Left channel: Q1 (gain - 417, Vbe - 0.759V), Q3 (gain - 417, Vbe - 0.760V)
Right channel: Q2 (gain - 418, Vbe - 0.761V), Q4 (gain - 419, Vbe - 0.760V)

Each pair of KSA992 transistors was carefully matched by current gain and base-emitter voltage

Pioneer SX-1010_New KSA992 transistors_matched by current gain and Vbe

The original NPN transistors (Q5 thru Q8) installed on this board are 2SC1313. These are also known as noisy/leaky transistors. I replaced them with modern low noise Fairchild KSA1845. Watch the pinout on replacement transistors. The original transistor is BCE and the new one is ECB.

Equalizer amplifier board - before and after

Pioneer SX-1010_Equalizer Amp (AWF-013-0)_before servicing

Pioneer SX-1010_Equalizer Amp (AWF-013-0)_after servicing

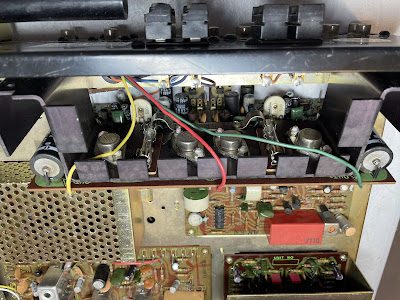
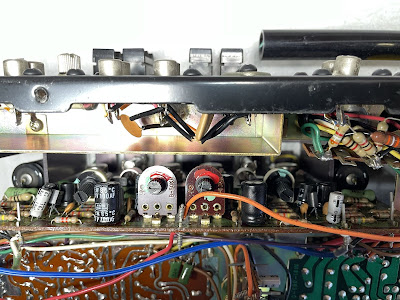
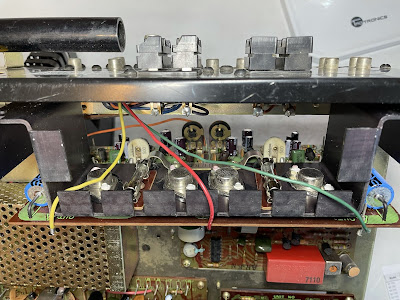
Power Amplifier Board (AWH-032-0)

Two power amplifier boards (AWH-032-0) are the most problematic boards to work on in Pioneer SX-1010. Each board is vertically mounted on the chassis and sits very close to the heat sink. The spacing between the PCB and mounting metal plate is too small for servicing. So, I disassembled the power amplifier board from the mounting plate and also moved the heat sink to get a space for servicing.

Mounting plate and heat sink removed for servicing

Pioneer SX-1010_Power Amplifier Board (AWH-032-0)_Mounting plate and heat sink removed

The power amplifier board (AWH-032-0) has two coupling capacitors (C1, C2) installed in the signal path and two aluminum electrolytic capacitors (C4, C8). The original coupling capacitors are the notorious sky blue Sanyo e-caps. I replaced them with high-quality film polyester WIMA MKS2 caps to improve the signal-to-noise ratio. The remaining aluminum e-caps were replaced with low impedance Nichicon UPW caps.

Test results on original capacitors removed from power amplifier board:

Left channel:
C1: rated capacitance – 0.68uF, measured – 0.75uF, ESR – N/A, deviation: +10%
C2: rated capacitance – 1.5uF, measured – 1.4uF, ESR – 3.5Ω, deviation: -7%
C4: rated capacitance – 10uF, measured – 12uF, ESR – 1.48Ω, deviation: +20%
C8: rated capacitance – 330uF, measured – 411uF, ESR – 0.04Ω, deviation: +25%

Right channel:
C1: rated capacitance – 0.68uF, measured – 0.88uF, ESR – N/A, deviation: +29%
C2: rated capacitance – 1.5uF, measured – 1.8uF, ESR – 5.8Ω, deviation: +20%
C4: rated capacitance – 10uF, measured – 11uF, ESR – 1.08Ω, deviation: +10%
C8: rated capacitance – 330uF, measured – 377uF, ESR – 0.06Ω, deviation: +14%

The power amplifier circuit in Pioneer SX-1010 is a 2-stage differential amplifier and 3-stage Darlington parallel push-pull direct-coupled OCL circuitry. A well-designed differential stage plays a key role in getting low distortion. Carefully matched transistors help maintain precise thermal tracking for low distortion despite changing ambient temperature conditions.

Three PNP transistors (Q1, Q2, Q3) installed on this board are notorious 2SA726 transistors. These transistors get very noisy over time. I replaced them with modern low noise Fairchild KSA992 transistors. Before installation, all new transistors were carefully matched by current gain and base-emitter voltage. Watch the pinout on replacement transistors. The original transistor is BCE and the new one is ECB.

I also replaced two NPN transistors (Q5, Q6) on this board. The original transistors installed in these positions are notorious 2SC1451 and often found faulty. I replaced them with modern Fairchild KSC3503's.

The original trimming resistors VR01 (2.2 kΩ) and VR02 (470 Ω) were replaced with new Bourns potentiometers.

Power amplifier board (left and right channel) - before servicing (sorry, forgot to take a picture of the right channel board before servicing)

Pioneer SX-1010_Power Amplifier Board (AWH-032-0)_before servicing

Power amplifier board (left and right channel) - after servicing

Pioneer SX-1010_Power Amplifier Board (AWH-032-0)_Left channel_after servicing

Pioneer SX-1010_Power Amplifier Board (AWH-032-0)_Right channel_after servicing

Filter Capacitors

I performed an in-circuit test on two large filter capacitors with Atlas ESR70 capacitance meter.  Both caps are still within the factory capacitance tolerance and have zero ESR. So, I didn't change them. In general, the filter capacitors rarely fail in vintage gears, and I usually don't replace them unless their ESR is high.

In-circuit test on two filter capacitors - both are still in spec

C9: rated capacitance – 18000uF, measured – 19980uF, ESR – 0Ω, deviation: +11%
C10: rated capacitance – 18000uF, measured – 20510uF, ESR – 0Ω, deviation: +14%

Dial and Meter Lamps

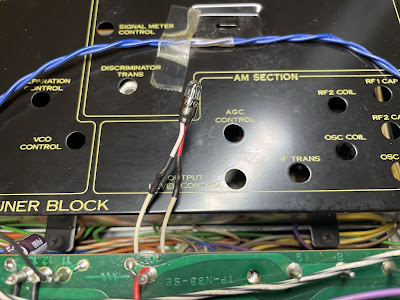
It is pretty easy to replace the meter and dial lamps in the SX-1010. The meter lamps are located under a lamp holder (ANG-097-0). Just unscrew two small screws and this holder will be released from the chassis. I replaced the original incandescent lamps with new warm white LED lamps. Six dial lamps are located on the lamp board assembly AWX-069-0. This board can be easily released from the chassis if unscrewing two small screws from the PC board cover (ANG-100-0). All original incandescent lamps were replaced with warm white LED lamps to maintain the original look and decrease heat. The original electrolytic capacitor C1 (220uF/16V) installed on this board was replaced with a low impedance Nichicon UPW cap.

Lamp board assembly AWX-069-0 - original incandescent lamps

Pioneer SX-1010_Lamp Board Assembly AWX-069-0_original incandescent lamps

Lamp board assembly AWX-069-0 - warm white LED lamps

Pioneer SX-1010_Lamp Board Assembly AWX-069-0_warm white LED lamps

Pilot Lamp for FM Program Source

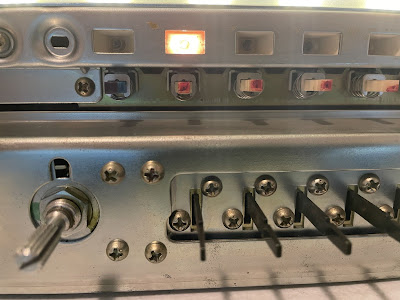
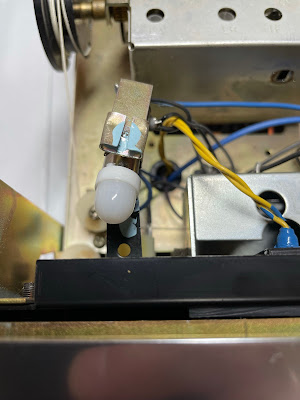
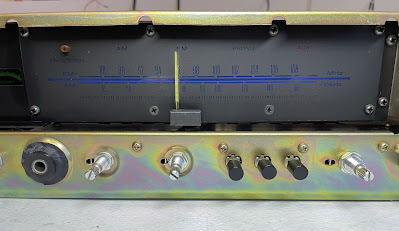
The original pilot lamp (8V/50mA) for the FM program source was burned out and I replaced it with a new incandescent lamp (8V/60mA). It is very easy to do when the dial scale is removed.

New incandescent pilot lamp for FM program source

Pioneer SX-1010_New pilot lamp for FM program source

Pioneer SX-1010_New pilot lamp for FM program source_installed

DC offset and Bias Adjustments

The DC offset and bias adjustments are pretty straightforward and clearly described in the service manual. The DC offset is measured between pin #19 and the ground. I adjusted it as close to zero volts as possible with the trimming resistor VR01 (2.2 kΩ). The bias is measured across two emitter resistors (R29 and R30) between pins #14 and #16. Be aware that there is an error in the service manual. The bias should be adjusted to 25mV instead of 50mV (as stated in the manual). It corresponds to the idling current of 25mA. So, I adjusted the bias on each channel to ~25mA with the trimming resistor VR02 (470 Ω).

DC offset on the left and right channel after restoration

Pioneer SX-1010_DC offset_left channel

Pioneer SX-1010_DC offset_right channel

Bias on the left and right channel after restoration

Pioneer SX-1010_Bias_left channel

Pioneer SX-1010_Bias_right channel

Output Power Test

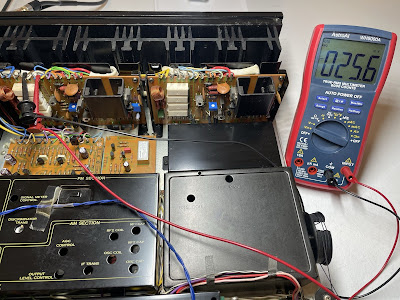
The final output power test was performed at the end of my restoration. The amplifier was loaded with a low inductance 8Ω/100W dummy resistor for each channel. The oscilloscope was connected across the speaker terminals and a sine-wave signal of 1kHz was applied to the AUX jacks. The output sine-wave signal was perfectly symmetrical on both channels with no clipping up to 28.10 VRMS (left channel) and 28.02 VRMS (right channel). It corresponds to the output power of 98.7W on the left channel and 98.1W on the right channel. Yes, it is still a real Monster! Even though this unit is 48 years old.

Output power test

Pioneer SX-1010_Output Power Test

As usual, all the knobs and the front panel were gently cleaned in warm water with dish soap. All knobs were also slightly polished by Mothers Mag & Aluminum polish to remove some small spots of aluminum oxidation. All pots and switches have been cleaned with DeoxIT 5% contact cleaner and lubricated with DeoxIT FaderLube 5% spray.

The final result can be seen in the photos below. The receiver looks brand new again and sounds fantastic! Please watch a short demo video at the end of this post. Thank you for reading.

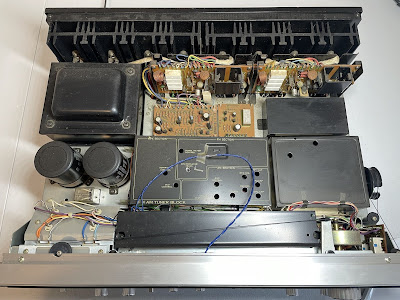
Pioneer SX-1010 - look inside before restoration

Pioneer SX-1010_Inside_before servicing

Pioneer SX-1010 - look inside after restoration

Pioneer SX-1010_Inside_after servicing

Pioneer SX-1010 - after restoration

Pioneer SX-1010_After restoration

Pioneer SX-1010_After restoration with parts

Demo video after repair & restoration

Monday, December 6, 2021

Pioneer SX-770 Receiver Restoration

Unit: AM/FM Stereo Receiver
Manufacturer: Pioneer
Model: SX-770
SN: RL3311218

I bought this receiver a few months ago from a kind old gentleman for a fair price. The receiver is in excellent cosmetic condition and I always wanted to have this model in my private collection. 

The SX-770 was introduced in 1970 just before the silver face era and was manufactured in 1970-71. It produces 15 watts per channel into 8 ohms with no more than 0.8% total harmonic distortion. The list price in 1970 was $249.95 (Ref. High Fidelity Magazine, April 1970, page 33).

As Pioneer states in its brochure: "The SX-770 has a uniquely attractive smoked dial glass. AM and FM indicators light up only during the reception, and the tuning needle glides over a tuning scale illuminated in blue. With its oiled walnut cabinet and black front panel, the SX-770 makes a handsome addition to the décor of any room". And I totally agree with that! It has a fantastic design, clear and warm sound, and a so-called "McIntosh look". I think it is a very cool receiver from the early 70's.

According to the Pioneer database, this particular unit was manufactured in December 1971. So, it was exactly 50 years ago!

Pioneer SX-770_after restoration

Power Supply Board (W16-024)

The power supply board (W16-024) has four aluminum electrolytic capacitors C4 thru C7. I replaced them with low impedance and high-reliability Nichicon UPW/UPM caps. All original e-caps removed from this board were tested with Atlas ESR70 capacitance meter and the results are below. All of them are outside the factory capacitance tolerance +/- 20%.

Test results on original capacitors removed from the power supply board:

C4: rated capacitance – 100uF, measured – 128uF, ESR – 0.08Ω, deviation: +28%
C5: rated capacitance – 220uF, measured – 297uF, ESR – 0.01Ω, deviation: +35%
C6: rated capacitance – 220uF, measured – 288uF, ESR – 0.01Ω, deviation: +31%
C7: rated capacitance – 100uF, measured – 151uF, ESR – 0.26Ω, deviation: +51%

The NPN transistor Q2 installed on this board is 2SC870. This is a well-known transistor prone to failure. I replaced it with a modern low noise Fairchild KSC1845. Watch the pinout on the replacement transistor. The original transistor (2SC870) is BCE and the new one (KSC1845) is ECB.

Power supply board - before and after

Pioneer SX-770_Power Supply (W16-024)_before servicing

Pioneer SX-770_Power Supply (W16-024)_after servicing

Control Amplifier Board (W15-033)

Four original coupling capacitors (C1, C2, C7, C8) installed in the signal path on this board are failure-prone sky blue Sanyo e-caps. As expected, the measured capacitance of all e-caps is outside of the factory capacitance tolerance. The coupling capacitor C8 is still within the factory tolerance but its ESR is abnormally high. For more information about sky blue Sanyo e-caps refer to my previous post on Pioneer SX-828 restoration. Two e-caps installed in the input signal path (C1, C2) were replaced with film polyester WIMA MKS2 caps. And other two e-caps installed in the output signal path (C7, C8) were replaced with modern low leakage Nichicon UKL capacitors. The measured capacitance of the remaining four aluminum e-caps are also outside of the factory capacitance tolerance and I replaced them with low impedance Nichicon UPW/UPM caps.

Test results on original capacitors removed from the control amplifier board:

C1: rated capacitance – 0.47uF, measured – 0.61uF, ESR – N/A, deviation: +30%
C2: rated capacitance – 0.47uF, measured – 0.79uF, ESR – N/A, deviation: +68%
C5: rated capacitance – 100uF, measured – 139uF, ESR – 5.9Ω, deviation: +39%
C6: rated capacitance – 100uF, measured – 153uF, ESR – 0.84Ω, deviation: +53%
C7: rated capacitance – 2.2uF, measured – 2.7uF, ESR – 2.8Ω, deviation: +23%
C8: rated capacitance – 2.2uF, measured – 2.1uF, ESR – 13.6Ω, deviation: -5%
C17: rated capacitance – 47uF, measured – 66uF, ESR – 0.24Ω, deviation: +40%
C18: rated capacitance – 47uF, measured – 65uF, ESR – 0.21Ω, deviation: +38%

Two NPN transistors installed on this board are 2SC870 (Q1, Q2) and I replaced them with a modern low noise Fairchild KSC1845.

TREBLE and BASS control potentiometers were cleaned and lubricated with DeoxIT FaderLube 5% spray.

Control amplifier board - before and after
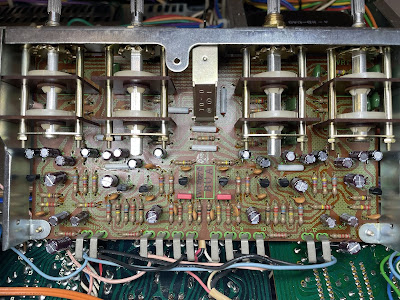
Pioneer SX-770_Control Amp (W15-033)_before servicing

Pioneer SX-770_Control Amp (W15-033)_after servicing

Push Switch Unit B (W15-087)

There is only one electrolytic capacitor C13 on this board. The original e-cap installed in this position is a notorious sky blue Sanyo e-cap. I replaced it with a film polyester WIMA MKS2 cap. 

Test results on original capacitors removed from the push switch unit B:

C13: rated capacitance – 0.47uF, measured – 0.58uF, ESR – N/A, deviation: +23%

A small metal mounting plate covers three push switches and limits access to the openings for cleaning and lubricating. Fortunately, this plate can be easily removed to get better access to these switches.

Push switch unit B - before and after

Pioneer SX-770_Push Switch Unit B (W15-085)_before servicing

Pioneer SX-770_Push Switch Unit B (W15-085)_mounting plate removed

Pioneer SX-770_Push Switch Unit B (W15-085)_after servicing

Head Amplifier Board (W15-032)

The head amplifier board has eight aluminum electrolytic capacitors: C1, C2, C7, C8, C9, C10, C15, and C16. Four of them are installed in the signal path. The original e-caps C1 and C2  installed in the input signal path are just ordinary aluminum e-caps. I replaced them with modern low leakage Nichicon UKL capacitors to improve a signal-to-noise ratio. The original e-caps C7 and C8 installed in the output signal path are notorious sky blue Sanyo e-caps. These were replaced with high-quality film polyester WIMA MKS2 caps. The remaining four aluminum e-caps were replaced with low impedance Nichicon UPW caps.

Test results on original capacitors removed from the head amplifier board:

C1: rated capacitance – 10uF, measured – 13uF, ESR – 3.2Ω, deviation: +30%
C2: rated capacitance – 10uF, measured – 13uF, ESR – 4.1Ω, deviation: +30%
C7: rated capacitance – 0.47uF, measured – 0.59uF, ESR – N/A, deviation: +26%
C8: rated capacitance – 0.47uF, measured – 0.61uF, ESR – N/A, deviation: +30%
C9: rated capacitance – 33uF, measured – 48uF, ESR – 1.1Ω, deviation: +46%
C10: rated capacitance – 33uF, measured – 47uF, ESR – 1.2Ω, deviation: +42%
C15: rated capacitance – 100uF, measured – 119uF, ESR – 0.01Ω, deviation: +19%
C16: rated capacitance – 100uF, measured – 163uF, ESR – 0.01Ω, deviation: +63%

Four NPN transistors installed on this board are 2SC871 (Q1, Q2) and 2SC870 (Q3, Q4). Both of them are well-known transistors prone to failure. I replaced them with a modern low-noise Fairchild KSC1845. Before installation, the new transistors were carefully matched by current gain and base-emitter voltage. Pay attention to the current gain in KSC1845 transistors while selecting them for replacement. The minimum current gain of the 2SC870 transistor is 250 whereas the 2SC871 has a minimum current gain of 350. So, make sure that both KSC1845 transistors installed in Q1 and Q2 positions have a current gain of at least 350 or higher. Also, watch the pinout on replacement transistors. The original 2SC870/871 transistor is BCE and the new one (KSC1845) is ECB.

Head amplifier board - before and after

Pioneer SX-770_Head Amp (W15-032)_before servicing

Pioneer SX-770_Head Amp (W15-032)_after servicing

Main Amplifier Board (W15-085)

The main amplifier board has twelve radial electrolytic capacitors C1 thru C8, C11 thru C14, and two axial coupling capacitors C17, C18. The original e-caps C3, C4, C5, C6 installed in the signal path are just ordinary aluminum e-caps. I replaced them with modern low leakage Nichicon UKL capacitors to improve a signal-to-noise ratio. The original axial coupling capacitors C17 and C18 installed in the output signal path were replaced with new Vishay axial e-caps (021 ASM series). The remaining eight aluminum e-caps were replaced with low impedance Nichicon UPW caps.

Test results on original capacitors removed from the main amplifier board:

C1: rated capacitance – 100uF, measured – 139uF, ESR – 0.31Ω, deviation: +39%
C2: rated capacitance – 100uF, measured – 156uF, ESR – 0.24Ω, deviation: +56%
C3: rated capacitance – 10uF, measured – 12uF, ESR – 3.1Ω, deviation: +20%
C4: rated capacitance – 10uF, measured – 12uF, ESR – 2.2Ω, deviation: +20%
C5: rated capacitance – 22uF, measured – 27uF, ESR – 0.65Ω, deviation: +23%
C6: rated capacitance – 22uF, measured – 27uF, ESR – 0.75Ω, deviation: +23%
C7: rated capacitance – 47uF, measured – 65uF, ESR – 0.97Ω, deviation: +38%
C8: rated capacitance – 47uF, measured – 63uF, ESR – 0.92Ω, deviation: +34%
C11: rated capacitance – 47uF, measured – 64uF, ESR – 0.91Ω, deviation: +36%
C12: rated capacitance – 47uF, measured – 63uF, ESR – 1.24Ω, deviation: +34%
C13: rated capacitance – 100uF, measured – 144uF, ESR – 0.18Ω, deviation: +44%
C14: rated capacitance – 100uF, measured – 149uF, ESR – 0.18Ω, deviation: +49%
C17: rated capacitance – 1000uF, measured – 1422uF, ESR – 0.01Ω, deviation: +42%
C18: rated capacitance – 1000uF, measured – 1270uF, ESR – 0.01Ω, deviation: +27%

Two NPN transistors (Q1, Q2) installed on this board are 2SC870 and I replaced them with low noise Fairchild KSC1845's.

It's hard to take a good picture of this board because it couldn't be completely released from the chassis. Some wires soldered to the board are very short. This board is still pretty convenient to service but just with limited access.

Main amplifier board - before and after

Pioneer SX-770_Main Amplifier Board (W15-085)_before servicing_01

Pioneer SX-770_Main Amplifier Board (W15-085)_before servicing_02

Pioneer SX-770_Main Amplifier Board (W15-085)_after servicing_01

Pioneer SX-770_Main Amplifier Board (W15-085)_after servicing_02

Muting Unit (W18-026)

The muting unit has two electrolytic capacitors C1 and C2. The e-cap C2 installed in the signal path was replaced with a low leakage Nichicon UKL capacitor. The e-cap C1 was replaced with a low impedance Nichicon UPW cap.

Test results on original capacitors removed from the muting unit:

C1: rated capacitance – 4.7uF, measured – 6.5uF, ESR – 2.6Ω, deviation: +38%
C2: rated capacitance – 2.2uF, measured – 3.7uF, ESR – 2.5Ω, deviation: +68%

Three NPN transistors (Q1, Q2, Q3) installed on this board are 2SC870. These were replaced with low noise Fairchild KSC1845's.

Muting unit - before and after

Pioneer SX-770_Muting Unit Board (W18-026)_before servicing

Pioneer SX-770_Muting Unit Board (W18-026)_after servicing

MPX Unit (W13-026A)

There are at least two different versions of the MPX circuit in the Pioneer SX-770: W13-024 and W13-026. This particular unit has version W13-026A. Five electrolytic capacitors are installed on this board: C1, C2, C4, C8, and C9. The e-cap C1 installed in the signal path was replaced with a low leakage Nichicon UKL capacitor. Two e-caps C8 and C9 installed in the signal path before the low pass filter are notorious sky blue Sanyo e-caps. These were replaced with film polyester WIMA MKS2 caps. The remaining e-caps were replaced with low impedance Nichicon UPW caps.

Test results on original capacitors removed from the MPX unit:

C1: rated capacitance – 2.2uF, measured – 3.3uF, ESR – 2.8Ω, deviation: +50%
C2: rated capacitance – 10uF, measured – 12uF, ESR – 3.1Ω, deviation: +20%
C4: rated capacitance – 3.3uF, measured – 4.6uF, ESR – 2.6Ω, deviation: +39%
C8: rated capacitance – 0.47uF, measured – 0.55uF, ESR – N/A, deviation: +17%
C9: rated capacitance – 0.47uF, measured – 0.57uF, ESR – N/A, deviation: +21%

The NPN transistor installed in position Q1 is the notorious 2SC870. I replaced it with a modern low noise Fairchild KSC1845 transistor. The other four NPN transistors (Q2, Q3, Q4, and Q5) installed on this board are prone to fail 2SC711. These were also replaced with a modern low noise Fairchild KSC1845 transistor.

MPX unit - before and after

Pioneer SX-770_MPX Unit Board (W13-026A)_before servicing

Pioneer SX-770_MPX Unit Board (W13-026A)_after servicing

Tuner Unit (W31-002)

The tuner unit has six aluminum electrolytic capacitors: C8, C19, C30, C32, C33, and C35. One of them (C33) is a notorious sky blue Sanyo e-cap. I replaced it with a film polyester WIMA cap. The e-cap C30 installed in the signal path was also replaced with a WIMA cap. The remaining aluminum capacitors were replaced with low impedance Nichicon UPW caps.

Test results on original capacitors removed from the tuner unit:

C8: rated capacitance – 10uF, measured – 13uF, ESR – 3.3Ω, deviation: +30%
C19: rated capacitance – 4.7uF, measured – 5.5uF, ESR – 3.4Ω, deviation: +17%
C30: rated capacitance – 0.47uF, measured – 0.53uF, ESR – N/A, deviation: +13%
C32: rated capacitance – 4.7uF, measured – 5.4uF, ESR – 3.4Ω, deviation: +15%
C33: rated capacitance – 1uF, measured – 1.2uF, ESR – 2.2Ω, deviation: +20%
C35: rated capacitance – 100uF, measured – 142uF, ESR – 0.32Ω, deviation: +42%

Tuner unit - before and after

Pioneer SX-770_Tuner Unit (W31-002)_before servicing

Pioneer SX-770_Tuner Unit (W31-002)_after servicing

Off-Board Parts

The original axial electrolytic capacitor C12 (220uF/6.3V) installed across the signal meter leads was replaced with a new Vishay axial e-cap (021 ASM series).

The original axial electrolytic capacitor C21 (4.7uF/16V) installed between the muting & MPX units was replaced with a low leakage Nichicon UKL capacitor. Note that even though the original e-cap is still within the factory capacitance tolerance the measured ESR is very high (see test data below).

The filter capacitor C15 (3300uF/50V) was tested in-circuit with Atlas ESR70 capacitance meter. It is still within the factory capacitance tolerance and has almost zero ESR. But I decided to replace it anyway with a new Nichicon LKG e-cap (3300uF/63V) as a part of preventive maintenance. The new Nichicon LKG e-cap is the same diameter as the original one but shorter. Thus, the same clamp can be used to attach it to the chassis.

Test results on original capacitors C12, C15, and C21:

C12: rated capacitance – 220uF, measured – 304uF, ESR – 0.24Ω, deviation: +38%
C15: rated capacitance – 3300uF, measured – 3890uF, ESR – 0.01Ω, deviation: +18%
C21: rated capacitance – 4.7uF, measured – 5.5uF, ESR – 12.8Ω, deviation: +17%

Original and new e-caps C21 and C12

Pioneer SX-770_C21 and C12_original e-caps

Pioneer SX-770_C21 and C12_new e-caps installed

Original and new filter capacitor C15

Pioneer SX-770_Filter Capacitor C15_original

Pioneer SX-770_Filter Capacitor C15_new Nichicon LKG series

Dial and Program Indicator Lamps

Four program indicator lamps in the Pioneer SX-770 are Bayonet base lamps (8V, 150mA). I replaced them with new incandescent lamps. The original tuning meter lamp is also a Bayonet base lamp. This lamp is mounted very close to the plastic tuning meter and over time discolors it due to extensive heat. I replaced it with a warm white LED lamp. The LED lamp has a similar color temperature as the original incandescent lamp but produces much less heat. This will protect the plastic from discoloration.

Warm white LED lamp behind the tuning meter

Pioneer SX-770_LED tuning meter lamp

To replace four dial lamps in the SX-770 the front panel and dial scale should be removed. It is actually very easy to do in comparison to most Marantz receivers from the 70's. The dial scale is mounted on the chassis with eight screws. I replaced the original incandescent lamps with warm white LED lamps.

Original dial lamps - easy to replace

Pioneer SX-770_Dial Scale

Pioneer SX-770_Original Dial Lamps

Audio Adjustments

The service manual has no instructions for main amplifier adjustment. I used the following procedure to adjust the amplifier. 

First of all, I checked the voltage at pin +B1 on the main amplifier board. The measured voltage was 46.10V. Then I set the collector voltage of transistor Q11 to half of the voltage measured at pin +B1 with trimming resistor VR1. Similarly, the collector voltage of transistor Q12 was set to half of the voltage measured at pin +B1 with trimming resistor VR2. After that, the oscilloscope was connected across the speaker terminals, and a sine-wave signal of 1kHz was applied to the AUX jacks. The audio signal level was increased until the audio output on the oscilloscope began to clip. The trimming resistor VR1 (VR2) was slightly adjusted for equal clipping on each channel.

The idle current was set to ~20mA in each channel with trimming resistor VR3 (VR4). This current can be set by measuring the voltage drop across emitter resistor R33 (R34). Since the nominal resistance of R33 (R34) is 0.5Ω, the voltage drop should be ~10mV.

Bias on the left and right channels after restoration

Pioneer SX-770_Bias_left channel

Pioneer SX-770_Bias_right channel

Output Power Test

The final output power test was performed at the end of my restoration. The amplifier was loaded with a low inductance 8Ω/100W dummy resistor for each channel. The oscilloscope was connected across the speaker terminals and a sine-wave signal of 1kHz was applied to the AUX jacks. The output sine-wave signal was perfectly symmetrical on both channels with no clipping up to 10.77 VRMS (left channel) and 10.61 VRMS (right channel). It corresponds to the output power of 14.5W on the left channel and 14.1W on the right channel.

Output power test

Pioneer SX-770_Output Power Test

As usual, all the knobs and the front panel were gently cleaned in warm water with dish soap. All controls have been cleaned with DeoxIT 5% contact cleaner and lubricated with DeoxIT FaderLube 5% spray. The wood case was treated with Howard's Restor-A-Finish.

The final result can be seen in the photos below. This receiver has a magnificent look. The sound is beautiful, clear and lovely warm. This is a very underrated receiver from the early 70's. I am very happy to have it in my private collection in excellent cosmetic condition. Please watch a short demo video at the end of this post. Thank you for reading.

Pioneer SX-770 - after restoration

Pioneer SX-770_after restoration

Pioneer SX-770_after restoration_with parts

Demo video after repair & restoration

Thursday, October 28, 2021

Pioneer SA-7500 II Stereo Integrated Amplifier Restoration

Unit: Stereo Integrated Amplifier
Manufacturer: Pioneer
Model: SA-7500 II
SN: XH36111130 

Today I'm showcasing a Pioneer SA-7500 II stereo integrated amplifier that came in for restoration. The SA-7500 II was manufactured from 1975 to 1978. It produces 40 watts per channel into 8 ohms with no more than 0.3% total harmonic distortion. The rear panel of SA-7500 II has input jacks for two turntables, two tape decks, a tuner, and an auxiliary source.

This particular unit is in perfect cosmetic condition and has no issues with electronics. I completed just routine servicing, i.e. cleaning and lubricating all the controls, replacing all electrolytic capacitors, bias adjustment checking, and final output power test. According to the Pioneer database, this particular unit was manufactured in August 1977.

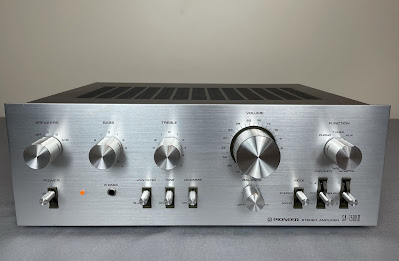
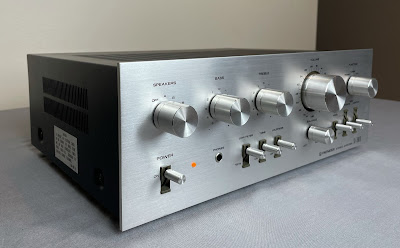
Pioneer SA-7500 II_After Restoration

Control Amplifier Board (AWG-047)

The control amplifier board AWG-047 is mounted to the sub-panel. In general, this board can be serviced without removing it from the chassis. However, two variable resistors (Bass and Treble) are assembled on the board and it is much easier to clean them when the board is being removed. So, I cleaned and lubricated both variable resistors with DeoxIT FaderLube 5% spray. The Volume variable resistor is assembled on its own small board and also mounted to the sub-panel. I cleaned it with DeoxIT FaderLube 5% spray as well. Finally, all the switches were cleaned with DeoxIT 5% contact cleaner and then lubricated with DeoxIT FaderLube 5% spray.

The original low leakage e-caps C5, C6, C9, and C10 installed in the signal path were replaced with modern low leakage Nichicon UKL capacitors. The remaining aluminum e-caps C19 and C20 were replaced with low impedance and high-reliability Nichicon UPW caps. All original e-caps removed from this board were tested with Atlas ESR70 capacitance meter and results are below. All of them except e-cap C5 are outside the factory capacitance tolerance +/- 20%.

Test results on original capacitors removed from the control amplifier board:

C5: rated capacitance – 47uF, measured – 54uF, ESR – 1.49Ω, deviation: +15%
C6: rated capacitance – 47uF, measured – 57uF, ESR – 1.23Ω, deviation: +21%
C9: rated capacitance – 3.3uF, measured – 4.2uF, ESR – 1.14Ω, deviation: +27%
C10: rated capacitance – 3.3uF, measured – 4.3uF, ESR – 1.21Ω, deviation: +30%
C19: rated capacitance – 47uF, measured – 59uF, ESR – 0.05Ω, deviation: +26%
C20: rated capacitance – 47uF, measured – 57uF, ESR – 0.16Ω, deviation: +21%

Control amplifier board (AWG-047) - before and after

Pioneer SA-7500 II_Control Amplifier_before

Pioneer SA-7500 II_Control Amplifier_after

AF Amplifier Board (AWK-079)

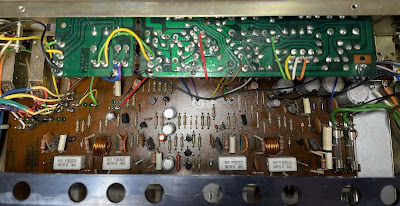
The power supply, protection, phono equalizer, and power amplifier circuits are assembled on one board (AWK-079).

The power supply and protection circuit has 10 aluminum e-caps: C45 thru C48, C54 thru C56, and C58 thru C60. All of them were replaced with low impedance Nichicon UPW/UPM caps.

Test results on original capacitors removed from the power supply and protection circuit:

C45: rated capacitance – 330uF, measured – 372uF, ESR – 0.08Ω, deviation: +13%
C46: rated capacitance – 330uF, measured – 373uF, ESR – 0.08Ω, deviation: +13%
C47: rated capacitance – 100uF, measured – 117uF, ESR – 0.12Ω, deviation: +17%
C48: rated capacitance – 2.2uF, measured – 2.1uF, ESR – 4.9Ω, deviation: -5%
C54: rated capacitance – 330uF, measured – 356uF, ESR – 0.01Ω, deviation: +8%
C55: rated capacitance – 330uF, measured – 344uF, ESR – 0.01Ω, deviation: +4%
C56: rated capacitance – 220uF, measured – 227uF, ESR – 0.02Ω, deviation: +3%
C58: rated capacitance – 47uF, measured – 52uF, ESR – 0.24Ω, deviation: +11%
C59: rated capacitance – 100uF, measured – 107uF, ESR – 0.08Ω, deviation: +7%
C60: rated capacitance – 220uF, measured – 263uF, ESR – 0.01Ω, deviation: +20%

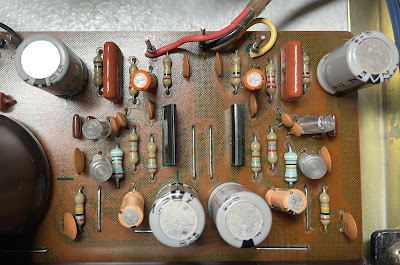
The phono equalizer circuit has four low leakage e-caps installed in the input (C1, C2) and output (C23, C24) signal path, two filtering aluminum e-caps (C61, C62), and two DC blocking aluminum e-caps (C9, C10) in the RIAA feedback loop. The e-caps installed in the input signal path were replaced with high-quality film polyester WIMA MKS2 caps. The e-caps installed in the output signal path were replaced with modern low leakage Nichicon UKL capacitors. Pay attention to the polarity of e-caps C23 and C24 installed in the output signal path. The polarity on the silkscreen is backward! The remaining four aluminum e-caps were replaced with low impedance Nichicon UPW caps.

The polarity of e-caps C23 & C24 is backward on the silkscreen

Pioneer SA-7500 II_Phono Equalizer_C23 & C24_Polarity is backwards

Test results on original capacitors removed from the phono equalizer circuit:

C1: rated capacitance – 1uF, measured – 1.1uF, ESR – 4.4Ω, deviation: +10%
C2: rated capacitance – 1uF, measured – 1.1uF, ESR – 5.1Ω, deviation: +10%
C9: rated capacitance – 220uF, measured – 264uF, ESR – 0.04Ω, deviation: +20%
C10: rated capacitance – 220uF, measured – 270uF, ESR – 0.05Ω, deviation: +23%
C23: rated capacitance – 2.2uF, measured – 2.8uF, ESR – 2.1Ω, deviation: +27%
C24: rated capacitance – 2.2uF, measured – 2.7uF, ESR – 2.4Ω, deviation: +23%
C61: rated capacitance – 220uF, measured – 265uF, ESR – 0.04Ω, deviation: +21%
C62: rated capacitance – 220uF, measured – 254uF, ESR – 0.06Ω, deviation: +16%

Phono equalizer circuit - before and after

Pioneer SA-7500 II_Phono Equalizer_before

Pioneer SA-7500 II_Phono Equalizer_after

The power amplifier circuit has two low leakage e-caps C31, C32 installed in the signal path, and two aluminum e-caps C35, C36 installed in the negative feedback loop. The e-caps installed in the input path were replaced with modern low leakage Nichicon UKL capacitors. And the remaining two aluminum e-caps were replaced with low impedance Nichicon UPW caps.

Test results on original capacitors removed from the power amplifier circuit:

C31: rated capacitance – 2.2uF, measured – 2.8uF, ESR – 2.1Ω, deviation: +27%
C32: rated capacitance – 2.2uF, measured – 2.7uF, ESR – 2.1Ω, deviation: +23%
C35: rated capacitance – 47uF, measured – 56uF, ESR – 0.74Ω, deviation: +19%
C36: rated capacitance – 47uF, measured – 55uF, ESR – 0.79Ω, deviation: +17%

AF amplifier board (AWK-079) - before and after

Pioneer SA-7500 II_AF Amplifier Board (AWK-079)_before servicing

Pioneer SA-7500 II_AF Amplifier Board (AWK-079)_after servicing

Bias Adjustments

The bias in Pioneer SA-7500 II is measured across two emitter resistors R57/R59 on the left channel (terminals TP1 and TP2) and across R58/R60 on the right channel (terminals TP3 and TP4). According to the service manual, the DC voltmeter reading tolerance is from 10mV to 70mV. This model has no trimmers for bias adjustments. Instead, it has one jumper per channel which should be cut if the voltage is less than 10mV. I measured the bias in each channel and the DC voltmeter reading was close to the middle of factory tolerance. So, no jumper leads were cut.

Bias on the left and right channel after restoration
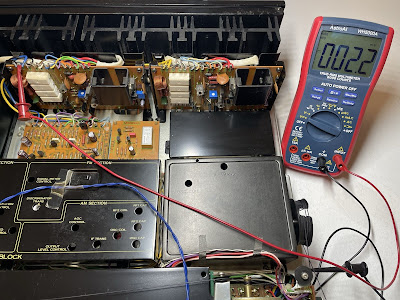
Pioneer SA-7500 II_Bias_left channel

Pioneer SA-7500 II_Bias_right channel

Output Power Test

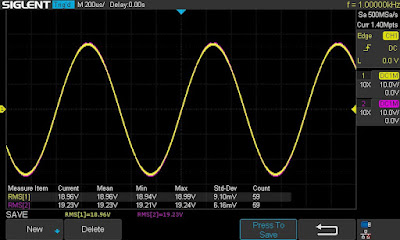
The final output power test was performed at the end of my restoration. The amplifier was loaded with a low inductance 8Ω/100W dummy resistor for each channel. The oscilloscope was connected across the speaker terminals and a sine-wave signal of 1kHz was applied to the AUX jacks. The output sine-wave signal was perfectly symmetrical on both channels with no clipping up to 18.96 VRMS (left channel) and 19.23 VRMS (right channel). It corresponds to the output power of 44.9W on the left channel and 46.2W on the right channel.

Output power test

Pioneer SA-7500 II_Output Power Test

As usual, all the knobs and the front panel were gently cleaned in warm water with dish soap. All knobs were also slightly polished by Mothers Mag & Aluminum polish to remove some small spots of aluminum oxidation.

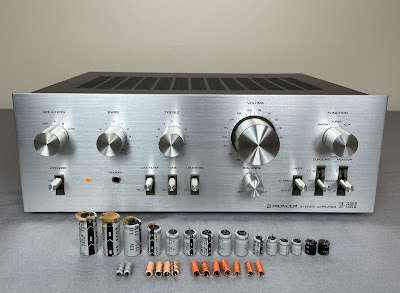
The final result can be seen in the photos below. This amplifier looks really very cool: clean and shiny. The sound is rich and very detailed. Please watch a short demo video at the end of this post. Thank you for reading.

Pioneer SA-7500 II - after restoration

Pioneer SA-7500 II_After Restoration

Pioneer SA-7500 II_After Restoration_02

Pioneer SA-7500 II_After Restoration_with parts

Demo video after repair & restoration